Unity的Shader学习笔记(18)[21/01/12_周二][60-62]
目录
课时62:FragmentShader-UV动画3-模糊采样
课时60:FragmentShader-UV动画1-偏移
视频:https://www.bilibili.com/video/BV1YK41157AC?p=60
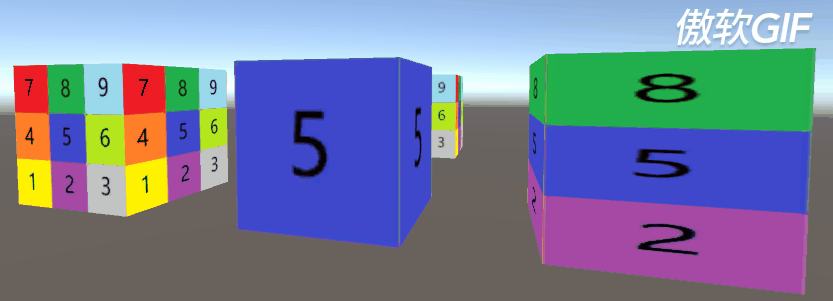
这节课的动画时通过脚本来实现的
1.制作一个贴图

2.写脚本
public class SetTextureUVST : MonoBehaviour
{
    public int width=3;
    public int height=3;
    public int fps=3;
    public int currentIndex;
    // Start is called before the first frame update
    IEnumerator Start()
    {
        Material mat=GetComponent<Renderer>().material;
        float scale_x=1.0f/width;
        float scale_y=1.0f/height;
        float waitTime=1.0f/fps;
        while(true)
        {
            Debug.Log("currentIndex1:"+currentIndex+"|"+waitTime);
            //width=3,height=3;width=3,height=1
            float offset_x=currentIndex % width * scale_x;
            float offset_y=currentIndex / height * scale_y;

            //width=1,height=3
            // float offset_x=currentIndex / width * scale_x;
            // float offset_y=currentIndex % height * scale_y;

            mat.SetTextureOffset("_MainTex",new Vector2(offset_x,offset_y));
            mat.SetTextureScale("_MainTex",new Vector2(scale_x,scale_y));
            yield return new WaitForSeconds(waitTime);
            currentIndex=(++currentIndex)%(width * height);
             Debug.Log("currentIndex2:"+currentIndex+"|"+waitTime);
        }
    }
}
3.结合材质,看效果
基本的uv shader
Shader "Custom/NewSurfaceShader 20"
{
    Properties
    {
        _MainTex("MainTex",2D) = ""{}
    }
    SubShader
    {
        pass
        {
            CGPROGRAM
            #pragma vertex vert
            #pragma fragment frag
            #include "unitycg.cginc"
            struct v2f{
                float4 pos:POSITION;
                float2 uv:TEXCOORD0;
            };
            sampler2D _MainTex;
            float4 _MainTex_ST;
            v2f vert(appdata_base v){
                v2f o;
                o.pos=UnityObjectToClipPos(v.vertex);
                //o.uv=v.texcoord.xy*_MainTex_ST.xy+_MainTex_ST.zw;
                o.uv=TRANSFORM_TEX(v.texcoord,_MainTex);
                return o;
            }
            fixed4 frag(v2f IN) :COLOR
            {
                fixed4 tc = tex2D(_MainTex, IN.uv);
                return tc;
            }
            ENDCG
        }
    }
    FallBack "Diffuse"
}
扩展练习:不通过脚本,都是用shader实现相同的效果。

Shader "Custom/NewSurfaceShader 21"
{
    Properties
    {
        _MainTex("MainTex",2D) = ""{}
        _Width("Width",int) = 3
        _Height("Height",int) = 3
        _FPS("FPS",int)=1
    }
    SubShader
    {
        pass
        {
            CGPROGRAM
            #pragma vertex vert
            #pragma fragment frag
            #include "unitycg.cginc"
            struct v2f{
                float4 pos:POSITION;
                float2 uv:TEXCOORD0;
            };
            sampler2D _MainTex;
            float4 _MainTex_ST;
            int _Width;
            int _Height;
            int _FPS;

            fixed4 getUVST(){
                float t=_Time.y*_FPS;
                int _Index=t % 9;

                float scale_x=1.0f/_Width;
                float scale_y=1.0f/_Height;

                float offset_x=_Index % _Width * scale_x;
                float offset_y=_Index / _Height * scale_y;
                return fixed4(scale_x,scale_y,offset_x,offset_y);
            }
            v2f vert(appdata_base v){
                v2f o;
                o.pos=UnityObjectToClipPos(v.vertex);
                _MainTex_ST=getUVST();
                //o.uv=v.texcoord.xy*_MainTex_ST.xy+_MainTex_ST.zw;
                o.uv=TRANSFORM_TEX(v.texcoord,_MainTex);
                return o;
            }
            fixed4 frag(v2f IN) :COLOR
            {
                fixed4 tc = tex2D(_MainTex, IN.uv);
                return tc;
            }
            ENDCG
        }
    }
}
脚本中的代码放到shader里改一下就好了,效果一样。
这越写越习惯了,以前怎么就没学起来呢,没时间练习吗?
课时61:FragmentShader-UV动画2-水波
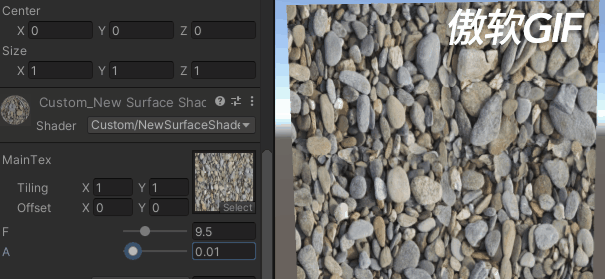
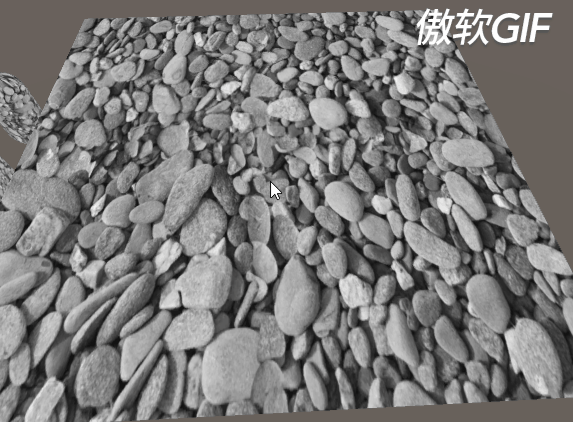
找个贴图先:https://www.textures.com/download/gravelcobble0023/48588
1.波动
写shader,根据uv,时间,sin,变化
Shader "Custom/NewSurfaceShader 22"
{
    Properties
    {
        _MainTex("MainTex",2D) = ""{}
        _F("F",range(0,30))=10 //周期
        _A("A",range(0,0.1))=0.01 //幅度
    }
    SubShader
    {
        pass
        {
            CGPROGRAM
            #pragma vertex vert
            #pragma fragment frag
            #include "unitycg.cginc"
            struct v2f{
                float4 pos:POSITION;
                float2 uv:TEXCOORD0;
            };
            sampler2D _MainTex;
            float4 _MainTex_ST;
            float _F;
            float _A;
            v2f vert(appdata_base v){
                v2f o;
                o.pos=UnityObjectToClipPos(v.vertex);
                o.uv=TRANSFORM_TEX(v.texcoord,_MainTex);
                return o;
            }
            fixed4 frag(v2f IN) :COLOR
            {
                float2 uv=IN.uv;
                uv+=_A*sin(IN.uv*3.14*_F+_Time.y);
                fixed4 tc = tex2D(_MainTex, uv);
                return tc;
            }
            ENDCG
        }
    }
}
效果:
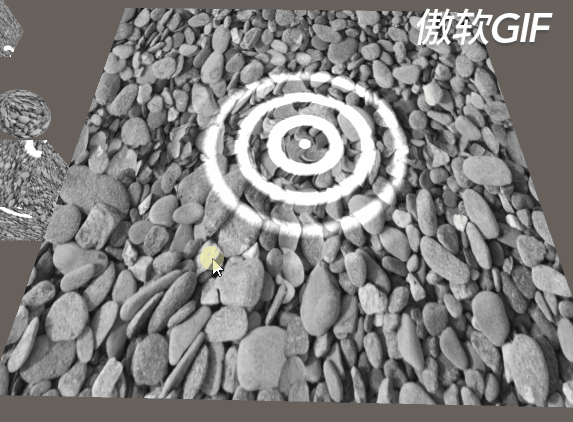
2.扩散的圆形水波
            fixed4 frag(v2f IN) :COLOR
            {
                float2 uv=IN.uv;
                //uv+=_A*sin(IN.uv*3.14*_F+_Time.y);
                float dis=distance(uv,float2(0.5,0.5));
                uv=uv+uv*_A*sin(dis*3.14*_F+_Time.y);
                fixed4 tc = tex2D(_MainTex, uv);
                return tc;
            }
看不清楚,需要测试一下
                float2 uv=IN.uv;
                float dis=distance(uv,float2(0.5,0.5));
                float scale=_A*sin(dis*3.14*_F+_Time.y);
                uv=uv+uv*scale;
                fixed tc=tex2D(_MainTex,uv)+fixed4(1,1,1,1)*saturate(scale)*100;
                return tc;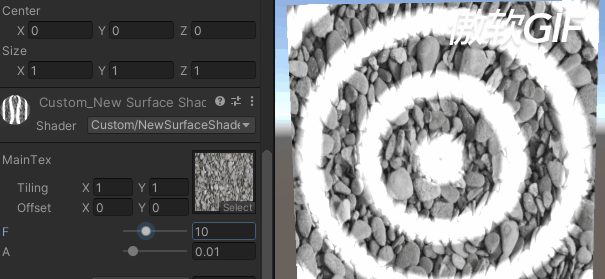
扩散的方向反了,dis前面加个负号
float scale=_A*sin(-dis*3.14*_F+_Time.y);
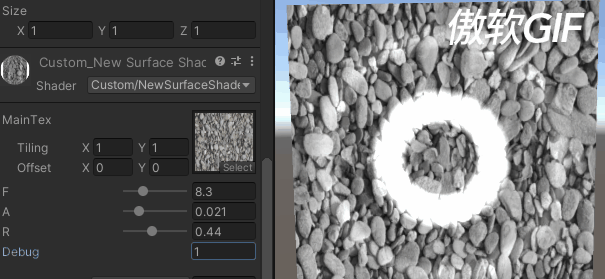
限制波的半径
                float2 uv=IN.uv;
                float dis=distance(uv,float2(0.5,0.5));
                float scale=0;
                if(dis<_R){
                    scale=_A*sin(-dis*3.14*_F+_Time.y);
                    uv=uv+uv*scale;
                }
                fixed tc=tex2D(_MainTex,uv)+fixed4(1,1,1,1)*saturate(scale)*100;
                return tc;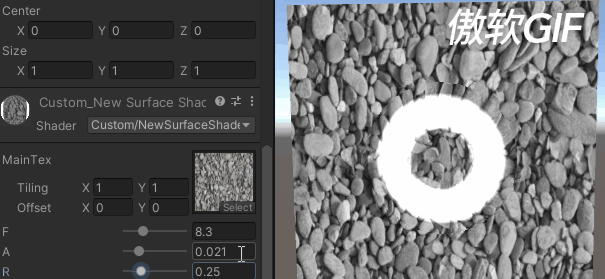
半径边缘太明显了
            fixed4 frag(v2f IN) :COLOR
            {
                float2 uv=IN.uv;
                float dis=distance(uv,float2(0.5,0.5));
                float scale=0;
                if(dis<_R){
                    _A *= 1-dis / _R;//远离了中心的幅度小
                    scale=_A*sin(-dis*3.14*_F+_Time.y);
                    uv=uv+uv*scale;
                }
                fixed tc=tex2D(_MainTex,uv)+fixed4(1,1,1,1)*saturate(scale)*100;
                return tc;
            }
去掉if
            fixed4 frag(v2f IN) :COLOR
            {
                float2 uv=IN.uv;
                float dis=distance(uv,float2(0.5,0.5));
                float scale=0;
                //if(dis<_R){
                    _A *= saturate(1-dis / _R);//远离了中心的幅度小
                    scale=_A*sin(-dis*3.14*_F+_Time.y);
                    uv=uv+uv*scale;
                //}
                fixed tc=tex2D(_MainTex,uv)+fixed4(1,1,1,1)*saturate(scale)*100;
                return tc;
            }
扩展练习
结合脚本,点击事件,世界坐标映射到uv坐标,水波半径逐渐变大,波动能量逐渐变小。
比想象的麻烦,
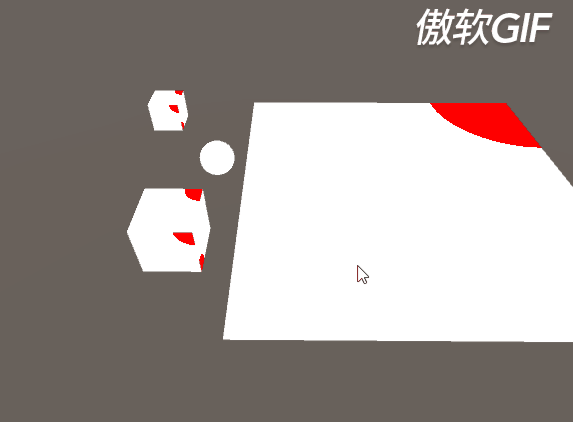
1.如何获取点击点的uv坐标
public class ClickObject : MonoBehaviour
{

    // Update is called once per frame
    void Update()
    {
        if(Input.GetMouseButtonUp(0)){
            Debug.Log("Click");
            Ray ray=Camera.main.ScreenPointToRay(Input.mousePosition);
            RaycastHit hit;
            if(Physics.Raycast(ray,out hit)){
                GameObject go=hit.collider.gameObject;
                Debug.Log("hit:"+go+"|"+hit.point);
                Debug.Log("Hit Texture coordinates = " + hit.textureCoord.x + "," + hit.textureCoord.y);
                //addHitPoint(hit.textureCoord.x*4-2, hit.textureCoord.y*4-2);
                Material mat=go.GetComponent<Renderer>().material;
                mat.SetFloat("_HitU",hit.textureCoord.x);
                mat.SetFloat("_HitV",hit.textureCoord.y);//uv坐标
                mat.SetFloat("_HitX",hit.point.x);
                mat.SetFloat("_HitY",hit.point.y);
                mat.SetFloat("_HitZ",hit.point.z);//世界坐标
            }
        }
    }
}
Shader测试UV距离
            float _HitX;
            float _HitY;
            float _HitZ;

            float _HitU;
            float _HitV;
            v2f vert(appdata_base v){
                v2f o;
                o.vertex=v.vertex;
                o.pos=UnityObjectToClipPos(v.vertex);//屏幕坐标
                o.uv=TRANSFORM_TEX(v.texcoord,_MainTex);//uv坐标
                return o;
            }
            fixed4 frag(v2f IN) :COLOR
            {
                float2 uv=IN.uv;
                float dis=distance(uv,float2(_HitU,_HitV));
                if(dis<0.3){
                    return fixed4(1,0,0,1);
                }
                else
                {
                    return fixed4(1,1,1,1);
                }
            }
测试结果Plane能够用,Cube等立方体模型不能用。
结合原来的水波shader,效果
发现是物体上必须有MeshCollider,其他Collider不行。
hit.textureCoord还是以前找热力图时的例子里面的代码的,找了半天也没找到从世界坐标转换到uv坐标的方法。
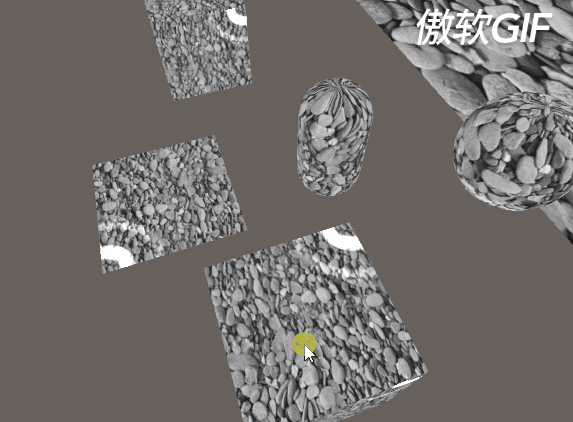
和uv热力图一样的问题,模型uv不连贯的话,波纹无法连贯,一样,改成世界坐标
            fixed4 frag(v2f IN) :COLOR
            {
                float2 uv=IN.uv;
                //float dis=distance(uv,float2(_HitU,_HitV));//uv坐标
                float3 wpos=mul(unity_ObjectToWorld,IN.vertex);//世界坐标
                float dis=distance(wpos,float3(_HitX,_HitY,_HitZ));
                float scale=0;
                _A *= saturate(1-dis / _R);//远离了中心的幅度小
                scale=_A*sin(-dis*3.14*_F+_Time.y);
                uv=uv+uv*scale;
                fixed tc=tex2D(_MainTex,uv)+ fixed4(1,1,1,1)*saturate(scale)*100 *_Debug;
                return tc;
            }
模型坐标
                float3 objHit=mul(unity_WorldToObject,float4(_HitX,_HitY,_HitZ,1));//模型坐标
                float dis=distance(IN.vertex,objHit);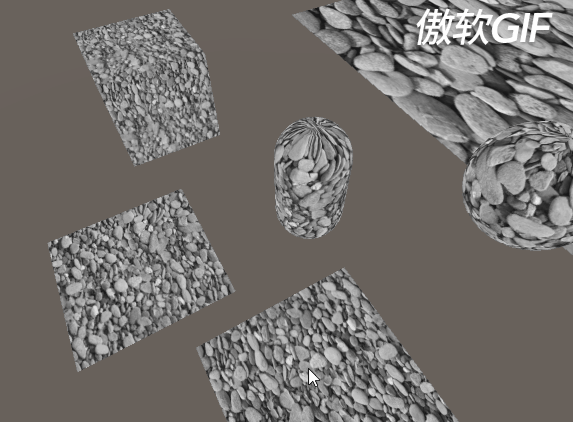
再加上 “水波半径逐渐变大,波动能量逐渐变小”
public class ClickObject : MonoBehaviour
{
    public float minR=0.5f;
    public float maxR=5;
    public float R=5;
    public float A=0.01f;
    public Material clickMat;
    public float startTime;
    public float usedTime;
    // Update is called once per frame
    void Update()
    {
        if(Input.GetMouseButtonUp(0)){
            Debug.Log("Click");
            Ray ray=Camera.main.ScreenPointToRay(Input.mousePosition);
            RaycastHit hit;
            if(Physics.Raycast(ray,out hit)){
                GameObject go=hit.collider.gameObject;
                Debug.Log("hit:"+go+"|"+hit.point);
                Debug.Log("Hit Texture coordinates = " + hit.textureCoord.x + "," + hit.textureCoord.y);
                //addHitPoint(hit.textureCoord.x*4-2, hit.textureCoord.y*4-2);
                Material mat=go.GetComponent<Renderer>().material;
                mat.SetFloat("_HitU",hit.textureCoord.x);
                mat.SetFloat("_HitV",hit.textureCoord.y);//uv坐标
                mat.SetFloat("_HitX",hit.point.x);
                mat.SetFloat("_HitY",hit.point.y);
                mat.SetFloat("_HitZ",hit.point.z);//世界坐标

                clickMat=mat;
                startTime=Time.time;
                R=0;
                // _F("F",range(0,30))=10 //周期
                // _A("A",range(0,0.1))=0.01 //幅度
                // _R("R",range(0,1))=1 //半径
            }
        }

        if(clickMat!=null){
            usedTime=Time.time-startTime;//水波半径逐渐变大,波动能量逐渐变小
            R=usedTime+minR;
            A=(1-R / maxR) * 0.01f;
            if(A<0){
                A=0;
            }
            clickMat.SetFloat("_A",A);
            clickMat.SetFloat("_R",R);
            if(A==0){
                clickMat=null;
            }
        }
    }
}
再来个多点波纹?不会。后续再找找资料。
课时62:FragmentShader-UV动画3-模糊采样
取样模糊
Shader "Custom/NewSurfaceShader 25"
{
    Properties
    {
        _MainTex("MainTex",2D) = ""{}
        _OffsetUV("OffsetUV",range(0,0.01))=0.001 //采样距离
    }
    SubShader
    {
        pass
        {
            CGPROGRAM
            #pragma vertex vert
            #pragma fragment frag
            #include "unitycg.cginc"
            struct v2f{
                float4 pos:POSITION;
                float2 uv:TEXCOORD0;
            };
            sampler2D _MainTex;
            float4 _MainTex_ST;
            float _OffsetUV;
            v2f vert(appdata_base v){
                v2f o;
                o.pos=UnityObjectToClipPos(v.vertex);//屏幕坐标
                o.uv=TRANSFORM_TEX(v.texcoord,_MainTex);//uv坐标
                return o;
            }
            fixed4 frag(v2f IN) :COLOR
            {
                float offset_uv=_OffsetUV;//采样距离 0.001
                float2 uv=IN.uv;
                fixed4 color=tex2D(_MainTex,uv);

                uv=IN.uv;
                uv.x=IN.uv.x+offset_uv;
                color.rgb+=tex2D(_MainTex,uv);

                uv=IN.uv;
                uv.x=IN.uv.x-offset_uv;
                color.rgb+=tex2D(_MainTex,uv);

                uv=IN.uv;
                uv.y=IN.uv.y+offset_uv;
                color.rgb+=tex2D(_MainTex,uv);

                uv=IN.uv;
                uv.y=IN.uv.y-offset_uv;
                color.rgb+=tex2D(_MainTex,uv);
                color.rgb/=5;
                return color;
            }
            ENDCG
        }
    }
}

使用tex2D做模糊采样
            fixed4 frag(v2f IN) :COLOR
            {
                float offset_uv=_OffsetUV;
                fixed4 color=tex2D(_MainTex,IN.uv,float2(offset_uv,offset_uv),float2(offset_uv,offset_uv));
                return color;
            }
效果类似。
各个分量的左右类似,应该时各个方向的模拟采样距离吧。
偏导数 ddx/ddy,特性值的变化率,变化量
uv从0-1
            fixed4 frag(v2f IN) :COLOR
            {
                float dx=ddx(IN.uv.x)*_OffsetUV;
                float2 dsdx =float2(dx,dx);
                float dy=ddy(IN.uv.y)*_OffsetUV;
                float2 dsdy=float2(dy,dy);
                fixed4 color=tex2D(_MainTex,IN.uv,dsdx,dsdy);
                return color;
            }
效果类似,有点差别。
根据z的变化,设置模糊度
            fixed4 frag(v2f IN) :COLOR
            {
                float2 dsdx =ddx(IN.z)*_OffsetUV;
                float2 dsdy=ddx(IN.z)*_OffsetUV;
                fixed4 color=tex2D(_MainTex,IN.uv,dsdx,dsdy);
                return color;
            }
理摄像机近的清晰,原的模糊。
还有个,聚焦,焦点清晰,其他模糊。