Spring Boot(二):Spring Boot中的Starter介绍
一、简介
添加Starter使用步骤:
- 创建SpringBoot应用,选中我们需要的模块(在ide创建的时候选择模块或者在pom文件中添加starter依赖),我们在使用Web开发时,选择的是spring-boot-starter-web。
- SpringBoot已经默认将这些场景配置好了,只需要在配置文件中指定少量的配置就可以了运行起来
- 自己编写核心业务代码
二、Starter原理介绍
在使用SpringBoot做Web开发时,我们会在pom中加入spring-boot-starter-web的依赖。
Starter的jar中没有一句java代码,有一个pom文件。
引入启动器依赖的作用有两个:
- 引入该场景的组件的所有需要的依赖
如spring-boot-starter-web会引入spring-webmvc等模块的依赖,引入自己所需要的依赖。 - 引入自动配置的jar包
starter都会引入spring-boot-starter的依赖,spring-boot-starter会引入spring-boot-autoconfigure的依赖。(任意一个starter都会引入spring组件的所有的自动配置,如我们引入we的starter也会将Spring的Cloud的自动配置加载进入容器)[括号中是我自己的理解,如果知道小伙伴可以评论交流一下]而1中的依赖确实是各个场景所需要的才会引入。
如何将自动配置类加载进容器的:
我们引入starter的依赖,会将自动配置的类的jar引入。@SpringBootApplication的注解中有一个是@EnableAutoConfiguration注解,这个注解在定义时(对这个不理解的小伙伴可以看一下之前的文章中的第三部分入门程序探究的注解部分),有一个@Import({EnableAutoConfigurationImportSelector.class}),EnableAutoConfigurationImportSelector内部则是使用了SpringFactoriesLoader.loadFactoryNames方法进行扫描具有META-INF/spring.factories文件的jar包。而自动配置类的jar的是有一个META-INF/spring.factories文件内容如下:
\是为了换行也可以使用,可以看到配置的结构形式是Key=>Value形式,多个Value时使用,隔开。
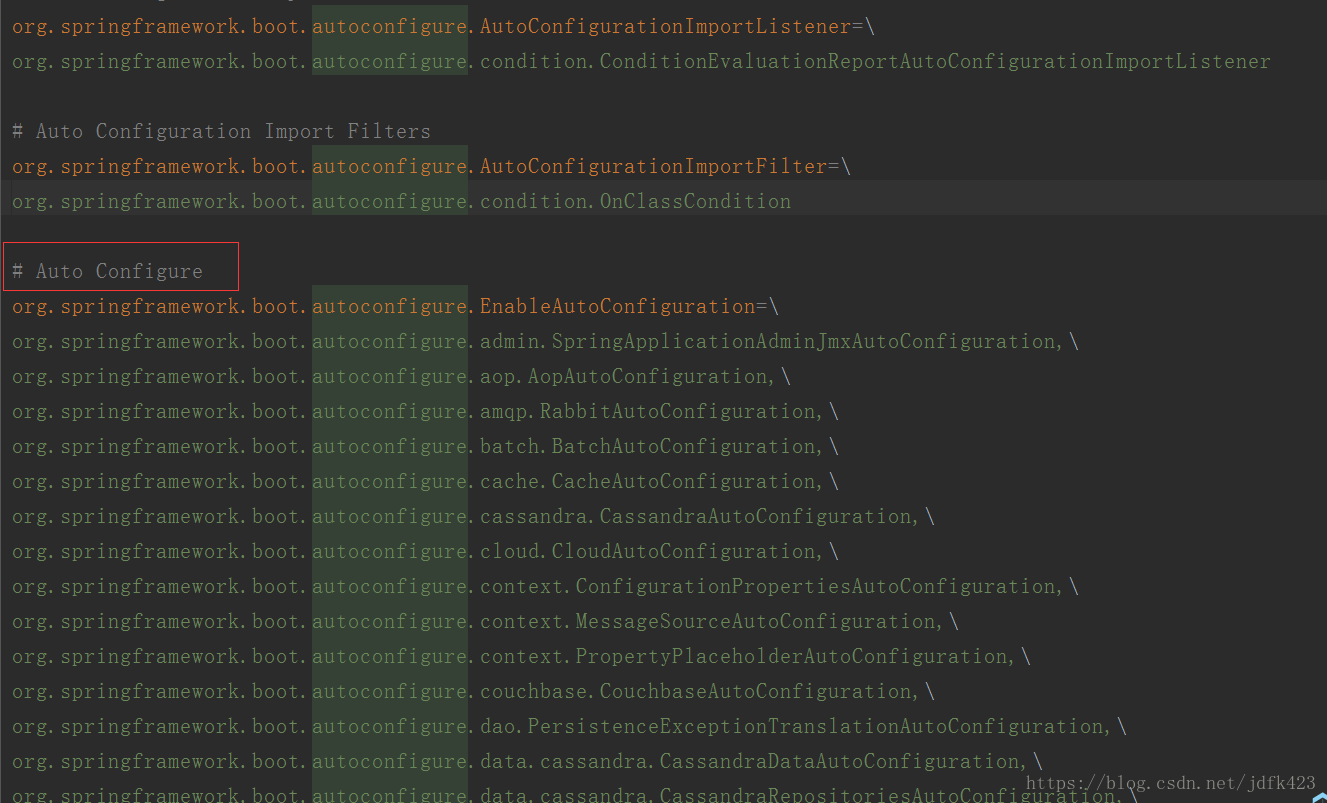
应用在启动时就会加载spring-boot-autoconfigure的jar包下面的META-INF/spring.factories文件中定义的autoconfiguration类。将configuration类中定义的bean加入spring到容器中。就相当于加载之前我们自己配置组件的xml文件。而现在SpringBoot自己定义了一个默认的值,然后直接加载进入了Spring容器。
这一部分更多的细节可以看看这两篇文章:
https://segmentfault.com/a/1190000011433487#articleHeader5
https://www.jianshu.com/p/29f3a2f65282
那怎么更改默认的配置:
SpringBoot之所以流行的原因,主要就是因为自动配置依赖默认支持和提供了很多自动配置依赖模块。所有的spring-boot-starter都有约定俗成的默认配置,但允许调整这些配置调整默认的行为。
虽然不同的starter实现起来各有差异,但是他们基本上都会使用到两个相同的内容:ConfigurationProperties和AutoConfiguration。因为Spring Boot坚信“约定大于配置”这一理念,所以我们使用ConfigurationProperties来保存我们的配置,并且这些配置都可以有一个默认值,即在我们没有主动覆写原始配置的情况下,默认值就会生效,这在很多情况下是非常有用的。除此之外,starter的ConfigurationProperties还使得所有的配置属性被聚集到一个文件中(properties文件),这样我们就告别了Spring项目中XML地狱。
我们来看一看starter的整体逻辑
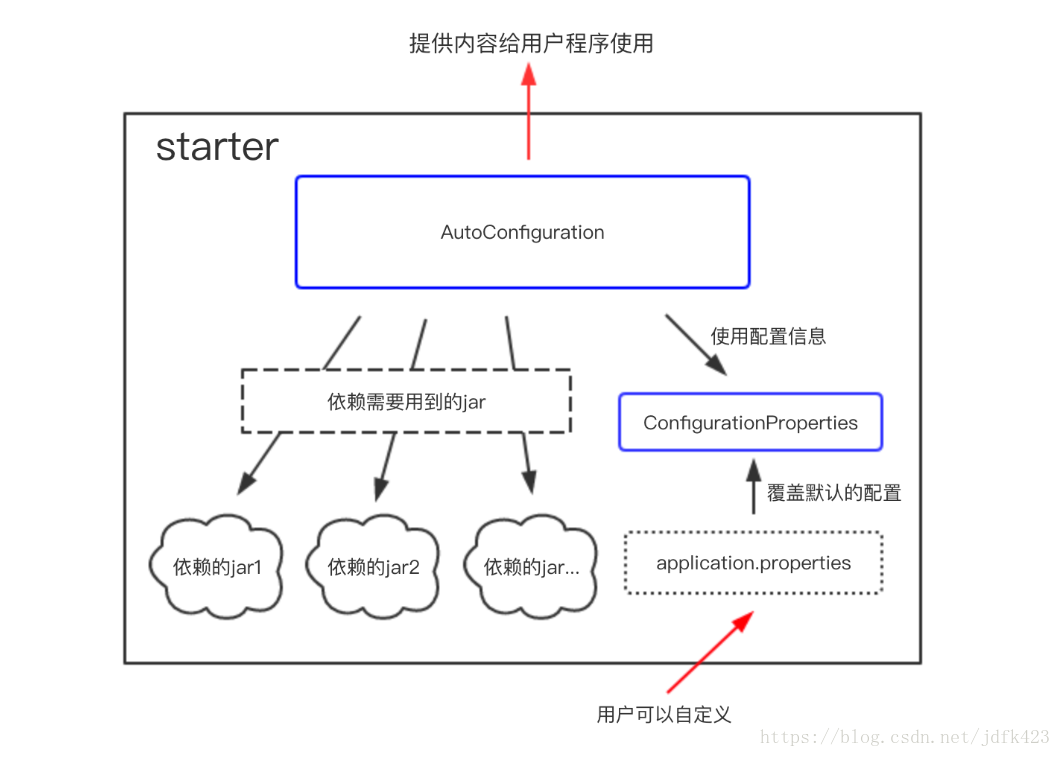
所以只要我们在application.properties中了写入配置信息就会覆盖掉默认的配置。
这一部分更多的细节可以查看
https://www.nosuchfield.com/2017/10/15/Spring-Boot-Starters/
我们可以通过创建自己的SpringBootStarter来了解更清楚:
我们会创建两个模块:
1.启动器只用来做依赖导入;
2.自动配置模块,专门来写一个自动配置模块;
(1)启动器模块
启动器只是用来引入自动配置模块和场景所需要的依赖。本场景中没有引入其他的依赖。只引入了自动配置模块。启动启动模块部分到此结束。
启动启动模块只需要一个pom文件即可。
<?xml version="1.0" encoding="UTF-8"?>
<project xmlns="http://maven.apache.org/POM/4.0.0"
         xmlns:xsi="http://www.w3.org/2001/XMLSchema-instance"
         xsi:schemaLocation="http://maven.apache.org/POM/4.0.0 http://maven.apache.org/xsd/maven-4.0.0.xsd">
    <modelVersion>4.0.0</modelVersion>

    <groupId>com.atguigu.starter</groupId>
    <artifactId>atguigu-spring-boot-starter</artifactId>
    <version>1.0-SNAPSHOT</version>

    <!--启动器-->
    <dependencies>

        <!--引入自动配置模块-->
        <dependency>
            <groupId>com.atguigu.starter</groupId>
            <artifactId>atguigu-spring-boot-starter-autoconfigurer</artifactId>
            <version>0.0.1-SNAPSHOT</version>
        </dependency>
    </dependencies>

</project>
(2)自动配置模块
自动配置模块的pom文件
<?xml version="1.0" encoding="UTF-8"?>
<project xmlns="http://maven.apache.org/POM/4.0.0" xmlns:xsi="http://www.w3.org/2001/XMLSchema-instance"
   xsi:schemaLocation="http://maven.apache.org/POM/4.0.0 http://maven.apache.org/xsd/maven-4.0.0.xsd">
   <modelVersion>4.0.0</modelVersion>

   <groupId>com.atguigu.starter</groupId>
   <artifactId>atguigu-spring-boot-starter-autoconfigurer</artifactId>
   <version>0.0.1-SNAPSHOT</version>
   <packaging>jar</packaging>

   <name>atguigu-spring-boot-starter-autoconfigurer</name>
   <description>Demo project for Spring Boot</description>

	<!--所有starter的父文件-->
   <parent>
      <groupId>org.springframework.boot</groupId>
      <artifactId>spring-boot-starter-parent</artifactId>
      <version>1.5.10.RELEASE</version>
      <relativePath/> <!-- lookup parent from repository -->
   </parent>

   <properties>
      <project.build.sourceEncoding>UTF-8</project.build.sourceEncoding>
      <project.reporting.outputEncoding>UTF-8</project.reporting.outputEncoding>
      <java.version>1.8</java.version>
   </properties>

   <dependencies>
      <!--引入spring-boot-starter;所有starter的基本配置-->
      <dependency>
         <groupId>org.springframework.boot</groupId>
         <artifactId>spring-boot-starter</artifactId>
      </dependency>
   </dependencies>
</project>
proproperties类,用来保存默认的配置。
package com.atguigu.starter;

import org.springframework.boot.context.properties.ConfigurationProperties;

@ConfigurationProperties(prefix = "atguigu.hello")
public class HelloProperties {

    private String prefix;
    private String suffix;

    public String getPrefix() {
        return prefix;
    }

    public void setPrefix(String prefix) {
        this.prefix = prefix;
    }

    public String getSuffix() {
        return suffix;
    }

    public void setSuffix(String suffix) {
        this.suffix = suffix;
    }
}
使用配置的类。
package com.atguigu.starter;

public class HelloService {

    HelloProperties helloProperties;

    public HelloProperties getHelloProperties() {
        return helloProperties;
    }

    public void setHelloProperties(HelloProperties helloProperties) {
        this.helloProperties = helloProperties;
    }

    public String sayHellAtguigu(String name){
        return helloProperties.getPrefix()+"-" +name + helloProperties.getSuffix();
    }
}
创建一个AutoConfiguration,引用定义好的配置信息;在AutoConfiguration中实现所有starter应该完成的操作,并且把这个类加入spring.factories配置文件中进行声明。
package com.atguigu.starter;

import org.springframework.beans.factory.annotation.Autowired;
import org.springframework.boot.autoconfigure.condition.ConditionalOnWebApplication;
import org.springframework.boot.context.properties.EnableConfigurationProperties;
import org.springframework.context.annotation.Bean;
import org.springframework.context.annotation.Configuration;

@Configuration
@ConditionalOnWebApplication //web应用才生效

//将带有@ConfigurationProperties注解的类注入为Spring容器的Bean
@EnableConfigurationProperties(HelloProperties.class)
public class HelloServiceAutoConfiguration {

    @Autowired
    HelloProperties helloProperties;
    @Bean
    public HelloService helloService(){
        HelloService service = new HelloService();
        service.setHelloProperties(helloProperties);
        return service;
    }
}
打包项目安装到Maven仓库,之后在一个SpringBoot项目中引入该项目依赖,然后就可以使用该starter了。
更详细的可以看这篇博客
https://www.nosuchfield.com/2017/10/15/Spring-Boot-Starters/