android–Zxing的引入和自定义部分扫描框
好不容易空了一段时间,终于可以写一下最近项目里遇到的问题和坑了。
最近有个项目需要用到扫描二维码功能,我便去搜索了一下,发现android平台上,Zxing是使用最为频繁的一个框架,于是就准备集成。然而我们有一个需求,就是在扫描界面要展示出扫描者所在的当前位置,因此,我也需要集成地图sdk,这里我用到了百度地图,当然这不是这篇文章的重点。这篇文章的重点是如何集成zxing,和如何进行简单的自定义扫描框体。
1.接入zxing以及基本布局
我是通过直接import module来实现接入的。
首先要下载zxing的lib包,然后通过import module使它作为一个module进入你的项目。
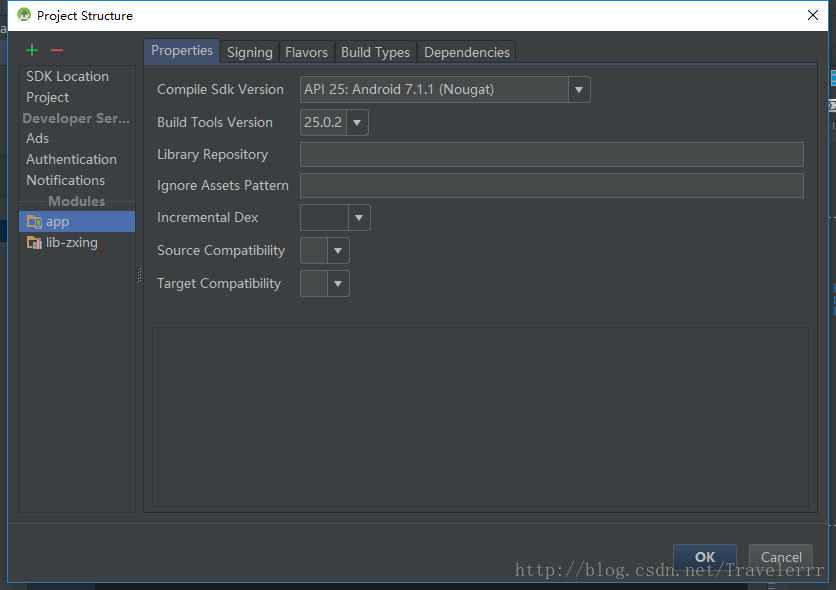
然后,要把这个zxing的module添加至主项目的依赖库。
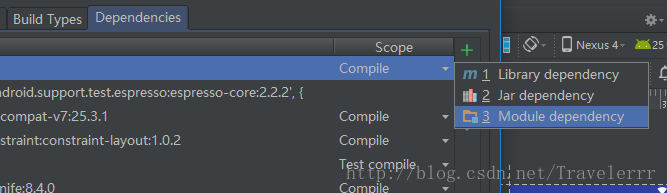
成功以后就可以看到gradle里面已经存在了zxing的配置。

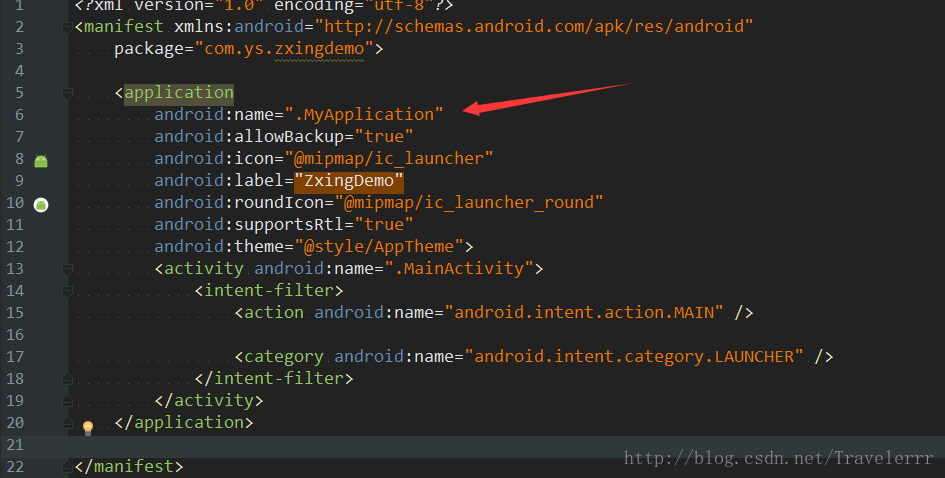
注意,还有一步,那就是在我们的application里初始化zxing,不然就会出现Both dimensions must be greater than 0 这个错误.

再贴一下基本布局 和 示意图。
<?xml version="1.0" encoding="utf-8"?>
<LinearLayout
    xmlns:android="http://schemas.android.com/apk/res/android"
    xmlns:tools="http://schemas.android.com/tools"
    android:layout_width="match_parent"
    android:layout_height="match_parent"
    android:orientation="vertical"
    tools:context="com.ys.zxingdemo.MainActivity">
    <LinearLayout
        android:layout_width="match_parent"
        android:layout_height="wrap_content">
        <TextView
            android:layout_width="wrap_content"
            android:layout_height="wrap_content"
            android:textColor="#000"
            android:textSize="20dp"
            android:text="想显示的文本"
            />
        <EditText
            android:layout_width="match_parent"
            android:layout_height="wrap_content"
            android:id="@+id/et_content"
            />
    </LinearLayout>
    <LinearLayout
        android:layout_width="match_parent"
        android:layout_height="wrap_content">
        <TextView
            android:layout_width="wrap_content"
            android:layout_height="wrap_content"
            android:textColor="#000"
            android:textSize="20dp"
            android:text="扫描结果"
            />
        <TextView
            android:layout_width="match_parent"
            android:layout_height="wrap_content"
            android:id="@+id/tv_result"
            />
    </LinearLayout>

    <Button
        android:id="@+id/bt_scan"
        android:layout_width="wrap_content"
        android:layout_height="wrap_content"
        android:text="进入扫描页面"
        />

 </LinearLayout>
2.自定义扫描框
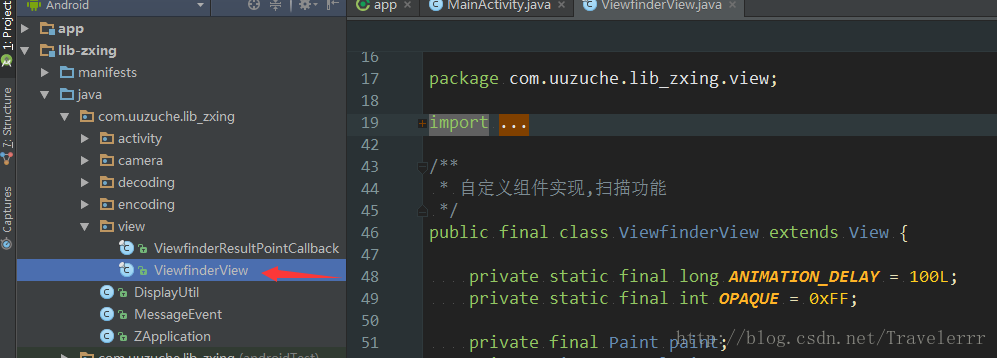
自定义扫描框,所需要的代码在Viewfinderview这个类里面,所需要做的就是重绘,画笔,之类的操作,我只知道一些比较基础的。
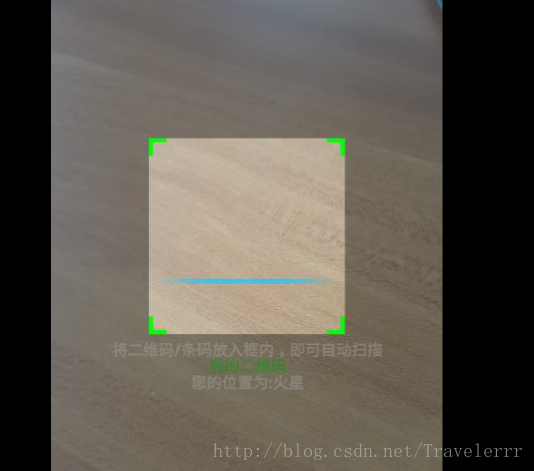
先展示一下我想实现的效果
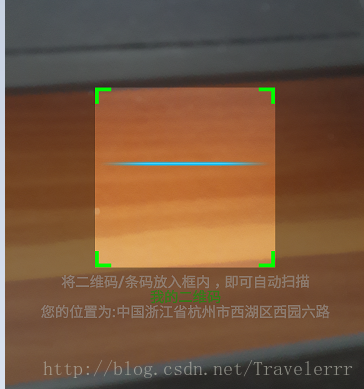
好的,那么来看看怎么修改viewfinderview里面的代码吧,主要是重写onDraw方法
@Override
public void onDraw(Canvas canvas) {
Rect frame = CameraManager.get().getFramingRect();
if (frame == null) {
return;
}
int width = canvas.getWidth();
int height = canvas.getHeight();
//画扫描框下面的字
paint.setColor(Color.WHITE);
paint.setTextSize(15 * density);
//越小,越透明
paint.setAlpha(0x80);
paint.setTypeface(Typeface.create("System", Typeface.BOLD));
//为了绘制在居中位置,得计算长度--第一部分-如何使用
String msg1 = getResources().getString(R.string.zxing_line1);
Rect rect1 = new Rect();
paint.getTextBounds(msg1,0,msg1.length(),rect1);
canvas.drawText(msg1,(frame.right-frame.left)/2+frame.left-rect1.width()/2, (frame.bottom+(float)20*density),paint);
//第二部分-我的二维码
paint.setColor(Color.GREEN);
paint.setTextSize(15 * density);
paint.setAlpha(0x80);
paint.setTypeface(Typeface.create("System", Typeface.BOLD));
String msg2 = getResources().getString(R.string.zxing_line2);
Rect rect2 = new Rect();
paint.getTextBounds(msg2,0,msg2.length(),rect2);
canvas.drawText(msg2,(frame.right-frame.left)/2+frame.left-rect2.width()/2, (frame.bottom+(float)35*density),paint);
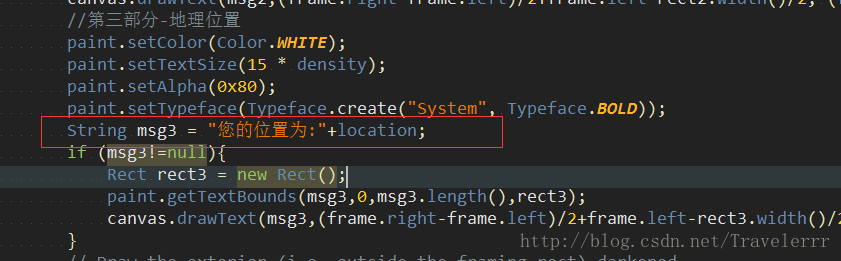
//第三部分-地理位置
paint.setColor(Color.WHITE);
paint.setTextSize(15 * density);
paint.setAlpha(0x80);
paint.setTypeface(Typeface.create("System", Typeface.BOLD));
String msg3 = "您的位置为:"+location;
if (msg3!=null){
Rect rect3 = new Rect();
paint.getTextBounds(msg3,0,msg3.length(),rect3);
canvas.drawText(msg3,(frame.right-frame.left)/2+frame.left-rect3.width()/2, (frame.bottom+(float)50*density),paint);
}
// Draw the exterior (i.e. outside the framing rect) darkened
paint.setColor(resultBitmap != null ? resultColor : maskColor);
canvas.drawRect(0, 0, width, frame.top, paint);
canvas.drawRect(0, frame.top, frame.left, frame.bottom + 1, paint);
canvas.drawRect(frame.right + 1, frame.top, width, frame.bottom + 1, paint);
canvas.drawRect(0, frame.bottom + 1, width, height, paint);
if (resultBitmap != null) {
// Draw the opaque result bitmap over the scanning rectangle
paint.setAlpha(OPAQUE);
canvas.drawBitmap(resultBitmap, frame.left, frame.top, paint);
} else {
drawFrameBounds(canvas, frame);
drawScanLight(canvas, frame);
Collection<ResultPoint> currentPossible = possibleResultPoints;
Collection<ResultPoint> currentLast = lastPossibleResultPoints;
if (currentPossible.isEmpty()) {
lastPossibleResultPoints = null;
} else {
possibleResultPoints = new HashSet<ResultPoint>(5);
lastPossibleResultPoints = currentPossible;
paint.setAlpha(OPAQUE);
paint.setColor(resultPointColor);
if (isCircle) {
for (ResultPoint point : currentPossible) {
canvas.drawCircle(frame.left + point.getX(), frame.top + point.getY(), 6.0f, paint);
}
}
}
if (currentLast != null) {
paint.setAlpha(OPAQUE / 2);
paint.setColor(resultPointColor);
if (isCircle) {
for (ResultPoint point : currentLast) {
canvas.drawCircle(frame.left + point.getX(), frame.top + point.getY(), 3.0f, paint);
}
}
}
postInvalidateDelayed(ANIMATION_DELAY, frame.left, frame.top, frame.right, frame.bottom);
}
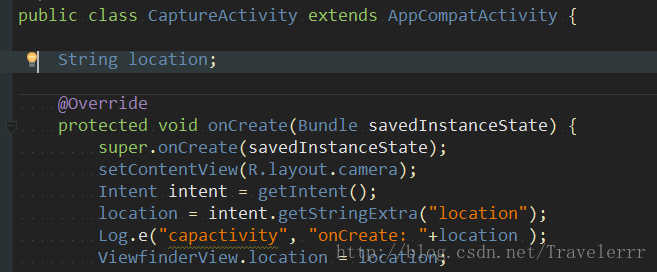
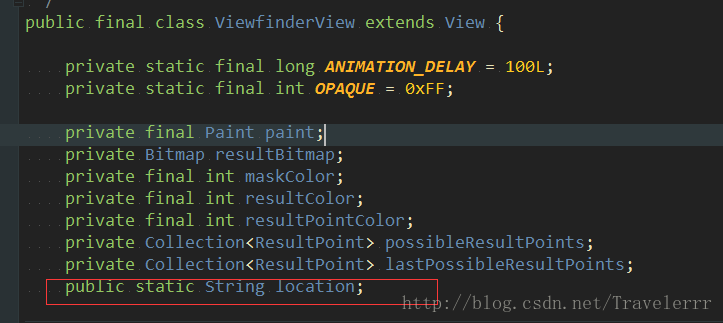
}这里面的location字符串就是我们在edittext里面写的内容,我是通过static 来进行值的获取的,可能不太规范。在打开相机的时候,我们首先进入的acitivity叫做CaptureActivity,所以我们就把mainactivity里的值传给CaptureActivity,再在CaptureActivity里面赋值给Viewfinderview里面的静态String ,这样viewfinderview里就可以使用到我们传过去的参数了。看起来怪怪的,不过你用eventbus也行,只要能把值传过去就行。
3.startActivity & onActivityResult
由于6.0以上需要有动态的权限判断,所以我用了RxPermission和Rxbinding。
这个zxing除了相机权限貌似还有一个VIBRATE权限,也不知道为啥,估计要振动吧,反正不加上就会报错,只好加上了。
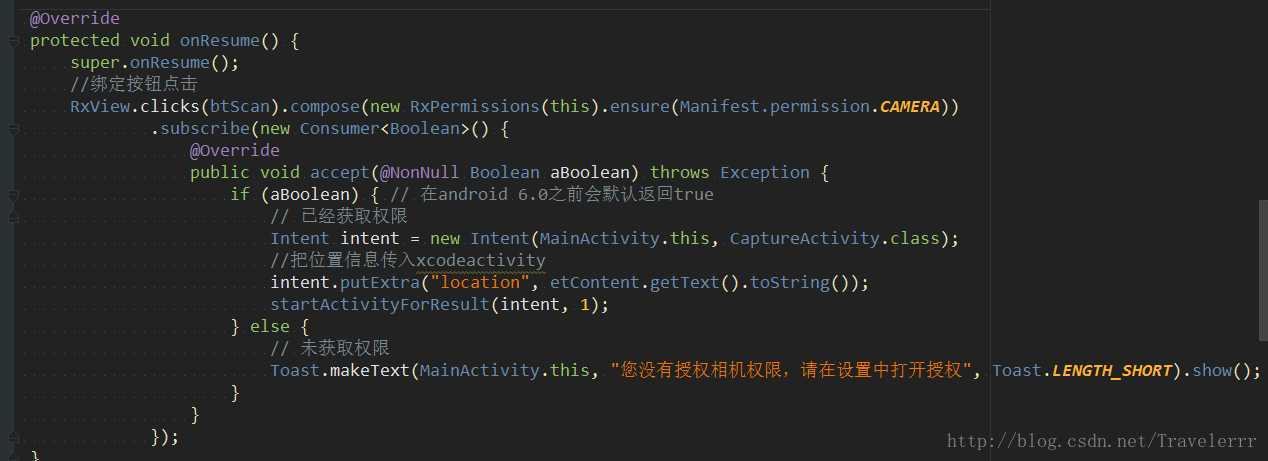
@Override
protected void onResume() {
super.onResume();
//绑定按钮点击
RxView.clicks(btScan).compose(new RxPermissions(this).ensure(Manifest.permission.CAMERA))
.subscribe(new Consumer<Boolean>() {
@Override
public void accept(@NonNull Boolean aBoolean) throws Exception {
if (aBoolean) { // 在android 6.0之前会默认返回true
// 已经获取权限
Intent intent = new Intent(MainActivity.this, CaptureActivity.class);
//把位置信息传入xcodeactivity
intent.putExtra("location", etContent.getText().toString());
startActivityForResult(intent, 1);
} else {
// 未获取权限
Toast.makeText(MainActivity.this, "您没有授权相机权限,请在设置中打开授权", Toast.LENGTH_SHORT).show();
}
}
});
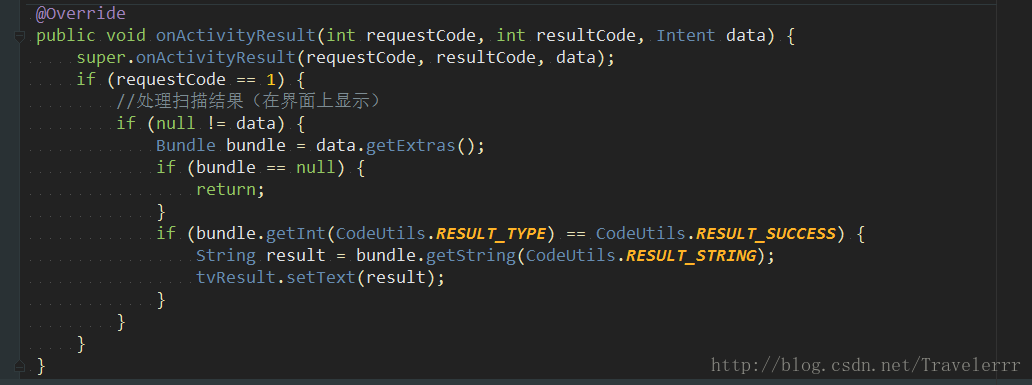
} @Override
public void onActivityResult(int requestCode, int resultCode, Intent data) {
super.onActivityResult(requestCode, resultCode, data);
if (requestCode == 1) {
//处理扫描结果(在界面上显示)
if (null != data) {
Bundle bundle = data.getExtras();
if (bundle == null) {
return;
}
if (bundle.getInt(CodeUtils.RESULT_TYPE) == CodeUtils.RESULT_SUCCESS) {
String result = bundle.getString(CodeUtils.RESULT_STRING);
tvResult.setText(result);
}
}
}
}不知道为啥排版和电脑上不一样,真是丑啊,放截图吧。
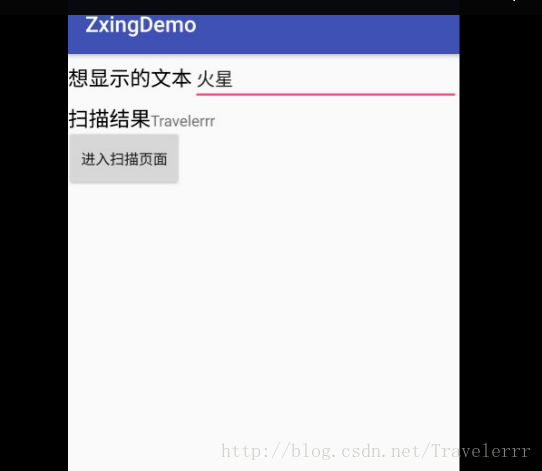
这样就实现基本功能了,最后放几张效果图,以及一张二维码(并不是支付宝)


总结:
排版很渣,不好意思。总体来说这个框架的可定制化还是挺强的,我加入文字只是一个小自定义,其实我们还可以自定义扫描框的颜色,样式,替换扫描的线条,甚至在那个界面设置按钮等等。希望大家多多探索。有什么问题也请指出,本人也算是小白,希望得到有经验人士的指点。
上传了项目文件,有需要可以下载一下看看
版权声明:本文为Travelerrr原创文章,遵循 CC 4.0 BY-SA 版权协议,转载请附上原文出处链接和本声明。