ROS 从安装到机械臂的仿真与实验
ROS 从安装到机械臂的仿真与实验
前言
刚刚结束在沈阳自动化研究所的实习,实习内容是实现机械臂的轨迹规划和仿真,使用的机械臂有UR5和Panda。沈自所的机器人实力确实很强,忙活了一个假期也只是学到了一点皮毛。这篇博客也算是一个实习的记录,将我在学习ROS过程中学到的知识和遇到的坑都记录下来,也希望能为其他还在ROS里挣扎的同学们提供一些帮助。鄙人不才,这篇博客顶多算是抛砖引玉。
本文将详细的介绍ROS,从安装到仿真再到实验。因为内容较多,可能一次无法写完,会持续补充。
1. Ubuntu+ROS系统的搭建
现在ROS可以同时运行在Windows环境和Linux环境下,但是Linux环境下还是相对稳定一些,而且也更适合于程序员开发。安装Linux操作环境可以选择用虚拟机或者直接双系统(如果想要与真实的机械臂相连,不能使用虚拟机,如果一定要使用虚拟机需要打上实时补丁),在这里我选择用虚拟机来做轨迹规划仿真,用另一台装有Linux系统的电脑来做后面的真机实验。VMware是市面上目前比较主流的虚拟机工作平台,在这里我们使用它创建虚拟机。Ubuntu 16.04是目前和ROS Kinetic版本兼容度最高的,鉴于我们之后会使用ROS Kinetic版本(因为这是比较稳定而且较新的版本),我们在虚拟机中安装Ubuntu 16.04版本。
a) 在VMware虚拟机中安装Ubuntu 16.04;
-
下载并安装VMware v12.1.0,下载Ubuntu 16.04镜像文件
-
运行VMware v12.1.0,创建新的虚拟机,遵循下面这个网页教程,可以完成后续安装,这里就不再赘述。(https://www.jianshu.com/p/3379892948da)
-
再安装好虚拟机和Ubuntu 16.04之后,我们重启虚拟机,往往会出现屏幕尺寸太小的情况。有以下两种方法可以解决:
- 第一种方法,在终端输入xrandr,并执行,输入我们需要设置的分辨率,xrandr -s 1920x1440,然后执行。
- 第二种方法,直接打开虚拟机的设置,更改屏幕分辨率再应用
b) 在Ubuntu16.04LTS 中安装ROS(版本Kinetic):
-
在控制台中输入命令:
sudo sh -c 'echo "deb http://packages.ros.org/ros/ubuntu $(lsb_release -sc) main" > /etc/apt/sources.list.d/ros-latest.list' -
再输入命令:
sudo apt-key adv --keyserver hkp://ha.pool.sks-keyservers.net:80 --recv-key 0xB01FA116 -
开始正式的安装,安装豪华至尊版ROS:
sudo apt-get update -
前几步一般不会有太大问题,安装完成后可以查看使用的包:
apt-cache search ros-kinetic -
到此,还没有结束,需要初始化:
sudo rosdep init -
rosdep update(这一命令会把所有相关的依赖项都升级到最新版)
(如果出现无法运行rosdep的情况,用rospack find rosdep检查rospack是否安装,用sudo apt install rospack-tools命令安装,但要注意的是,出现这种情况很有可能第2步执行安装命令出错,应该重新执行第2步) -
配置环境变量:
echo "source /opt/ros/kinetic/setup.bash" >> ~/.bashrc
(注意:kinetic的k是小写,如果出现“没有找到文件”的错误,可以通过gedit .bashrc来查看最后一行的source文件是否是小写k, 这里非常坑,很多教程都写错了) -
source ~/.bashrc -
此时,就完成了安装,可以测试一下:在命令行终端中输入roscore并运行。
此时如果出现:
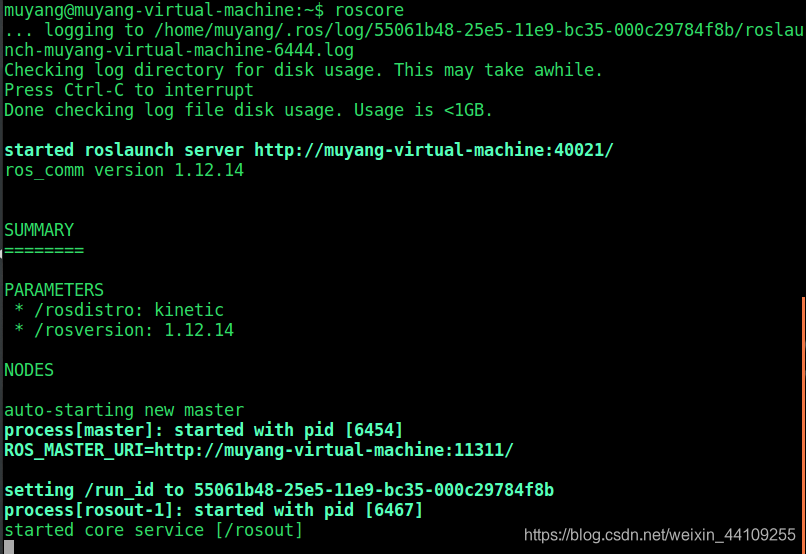
那么恭喜你,ROS成功安装上了 -
我们可以跑一个测试程序—小海龟。先安装示例 :sudo apt-get install ros-kinetic-turtlesim (16.04版本可能不用这一步也能直接跑)
然后,在三个不同的终端分别执行以下三个指令:
roscore
rosrun turtlesim turtlesim_node
rosrun turtlesim turtle_teleop_key
然后你就会看到经典的小乌龟窗口:
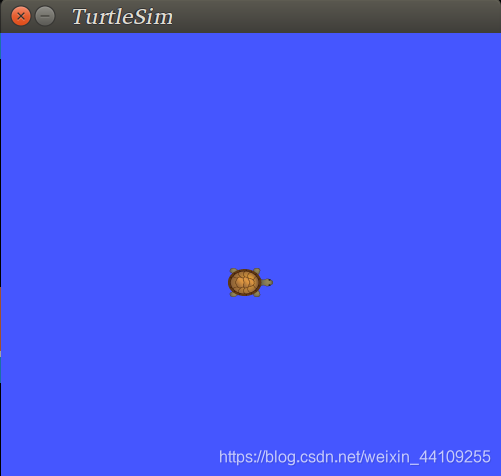
试试用上下左右建来控制小乌龟吧~ -
在正式使用ROS进行开发之前,我推荐大家几个插件,会在后面的开发时给大家节省大量的时间。
a).sudo apt install terminator(这是一个非常好用的终端插件,可以随意的分屏,鉴于我们平时使用ROS经常需要终端多开,可以随意分割窗口还是非常方便的)
b).sudo apt install python-pip(使用Python语言脚本进行开发的话,一定会用到的插件)
c).sudo pip install ipython(可以实现对仿真进行同步debug,因为有的时候程序本身没有错,但是结合仿真就会跑飞)
d).sudo apt install meld(一个文本比较工具,当你修改过某个文件夹下的多个文件,但是又想不起来修改过哪些时,会派上用场)
2. ROS工作原理与Node通讯机制:
在教大家如何使用ROS控制机械臂之前,我们先来了解一下ROS的基本知识:
a) 首先,什么是ROS:
ROS(Robot Operating System)是一个开源平台,集成了各种各样的服务,包括视觉识别,轨迹规划,模型仿真等很多强大的开发功能。
b) ROS通过Package来管理所需的文件,通常一个ROS Package包含以下文件或文件夹:
- Launch文件夹:包含所有launch文件
- Src文件夹:包含所有的cpp文件和python文件
- CMakeLists.txt:包含所有需要执行的cmake配置
- package.xml: 包含所有package信息和依赖项
c) ROS nodes(节点)
nodes是ROS里的一个基础程序,它是一个可执行文件,通过ROS与其他的nodes进行通讯。Nodes可以向topic发布或提取信息,可以提供或使用一个Service。
这里有个小技巧,我们自己创建node的时候,可以通过rosnode list来查看当前有哪些nodes在运行,如果我们创建的node不在列表里,那么说明我们的node可能没有运行起来,需要重新source一下。
d) ROS message
message是node在向topic发布或提取信息时的一种消息格式
可以使用rosmsg show 来查看某一种特定message的格式,因为message通常都是自定义的一种格式或已经定义好的一种格式,类似于C语言中的结构体,通常包含多个不同类型的变量。
e) 三种实现nodes间通信的方法
- Ros topic:message通过publisher和subscriber来传递于多个nodes之间,而topic类似于一个公告板,所有的nodes可以通过topic实现相互通信。一个topic可能会有很多publisher和subscriber,而一个node也可能会从多个topic上发布或获取message。Topic是用来表示message内容的名称。
比如:

左边的teleop_turtle和右边的turtlesim是两个ROS nodes,他们通过中间的topic“/turtle1/command_velocity”进行通讯。两个node是无法直接进行通讯的,通过发布器node发布message给topic,接收器再从topic上获取有用的信息,所以这种通讯通常不是同步的。 - ROS service: service 是另一种可以实现nodes之间相互通信的方式。于topic的方法不同在于,topic使用publisher和subscriber这种非常灵活的传递信息方式,但这种多对多,单向的灵活传递信息的方式,并不适用于分布式系统里需要答复请求的场景。所以衍生出了service的通信方式, service由一对message定义:一个用于请求,一个用于回复。当一个ROS node提供service通信时,客户端会发送一个请求给这个node,并停止动作等待回复。
- ROS action: Action 是第三种可以实现nodes之间相互通信的方式。Action和Service的区别在于,Service是同步的,当一个ROS程序调用一个service的时候,程序会停止当前的运行直到收到service的答复。而Action是不同步的,这就像启动一个新线程。当ROS程序调用action时,ROS程序可以在当前线程中等待action的答复,但在另一个线程中执行其他任务。
f) 什么是launch文件
还记得我们最开始时运行的小乌龟实例程序么?让我们来看看它的launch文件。
<launch>
  <!-- turtlebot_teleop_key already has its own built in velocity smoother -->
  <node pkg="turtlebot_teleop" type="turtlebot_teleop_key" name="turtlebot_teleop_keyboard"  output="screen">
    <param name="scale_linear" value="0.5" type="double"/>
    <param name="scale_angular" value="1.5" type="double"/>
    <remap from="turtlebot_teleop_keyboard/cmd_vel" to="cmd_vel_mux/input/teleop"/>
  </node>
</launch>
这里面node那一行是最重要的,我们先忽略其他的。
node那一行包含四个重要信息:
- pkg=“package_name” # Name of the package that contains the code of the ROS program to execute
- type=“cpp_executable_name” # Name of the cpp executable file that we want to execute
- name=“node_name” # Name of the ROS node that will launch our C++ file
- output=“type_of_output” # Through which channel you will print the output of the program
后面我们会详细介绍如何创建launch文件。
g)如何获取topic和message的信息
在ROS里,可以用rostopic list命令来获取所有可用的topic,同时也可以用rostopic echo <topic_name>命令来查看对应topic正在发布的消息,rostopic echo <topic_name> -n1可以获取对应topic发布的最后一条消息。
使用rostopic info <topic_name>命令可以查看对应topic的信息
如果想获得某一种message的信息,可以使用rosmsg show <message>命令,比如:rosmsg show std_msgs/Int32

这里的Int32是type,不过用法有点儿像struct
通过rostopic info <topic_name>可以知道你编写的Python文件需要发布什么类型的数据来控制机械臂,再用rosmsg show <message>来确定variable的名称
rostopic pub <topic_name> <message_type> <value>,这个命令可以用来立即发布一些你想要发布的指令,用来测试subscriber是否在正常运行,例如:rostopic pub /counter std_msgs/Int32 7 , 这个命令可以让counter向screen持续发送数字‘7’
重要总结:在使用ROS控制仿真时,如果能找对应的topic的名字,可以使用rostopic info <topic_name>命令来查看对应的msg的格式,然后再通过rosmsg show <message>命令来获取对应msg的组成部分,可以很容易的找到我们需要的数据组成,因为msg就像是一个结构体,而我们通常只需要结构体中的一小部分数据。在找到对应数据的调用格式之后,我们可以用rostopic echo <topic_name>命令来直观的看到对应topic的数据返回值的样子,这样有助于编写Python代码。当写完Python代码之后,就可以写launch文件和CMakelist文件了,这样一个完整的ROS包就算是初步组装完成可以运行啦~
3. 创建workspace(工作区)
ROS对机械臂的所有操作都是在一个工作区内实现的,所以我们先创建工作区。
-
 mkdir -p ~/XXX_ws/src   (这里的‘XXX’可以起自己喜欢的名字)
 cd ~/catkin_ws/
 catkin_make
 source devel/setup.bash
(有的教程里还有下面这句,但是我自己测试发现好像没什么用,大家要是有什么发现请告诉我)
echo $ROS_PACKAGE_PATH /home/youruser/catkin_ws/src:/opt/ros/kinetic/share (此处的"youruser"请修改为自己的用户名,也就是创建虚拟机时的那个)
4.创建一个ROS Package
-
cd ~/catkin_ws/src (打开我们刚刚创建的工作区) catkin_create_pkg <包的名字><包的依赖包> (包的名字随便起,如果是用CPP编程,依赖包就写roscpp,如果是Python编程,就是rospy) - 我用的是Python,所以下面我们按Python来建包:
catkin_create_pkg my_package rospy - 可以用rospack list | grep my_package,或roscd my_package来确认是否成功创建包。
注意:此处的my_package是刚刚创建的ROS包的名字,找不到的话用命令行:
source /home/muyang/Muyang_ws/devel/setup.bash
或者使用
sudo gedit ~/.bashrc
在最后一行添加
export ROS_PACKAGE_PATH=${ROS_PACKAGE_PATH}:/你的工作空间路径/src
注意:重启terminal生效 - 下一步,回到catkin_ws 文件夹下,运行
catkin_make
注意:当workspace下包含多个package时,可以用catkin_make --only-pkg-with-deps 你的ROS包对刚刚创建的‘‘你的ROS包’’进行catkin_make,有一个特殊的语句catkin_make -DCATKIN_WHITELIST_PACKAGES=“你的ROS包”,和前面的命令行一样,都是只运行指定的package
5. MoveIT控制机械臂:
1. 建立机械臂仿真模型:
a) 第一步建立工作区,生成文件夹,mkdir -p ~/Muyang_ws/src,这里我把自己的工作区起名为“Muyang_ws”
b) cd ~/ Muyang _ws/,打开刚刚生成的文件夹
c) catkin_make,这步很关键,是在生成相关的配置文件,包括Cmakelist.txt等
d) source devel/setup.bash,通过这个命令,我们就可以在ros中调用这个工作区下的文件了。
e) 第一步:使用sudo apt-get install ros-kinetic-moveit命令安装moveit,moveit是我们建立仿真模型的软件
f) 在第一步的基础上,我们使用sudo apt-get install ros-kinetic-franka-description命令安装panda机械臂的urdf
g) 通过roslaunch moveit_setup_assistant setup_assistant.launch命令,启动MoveIt! Setup Assistant,会出现下面这样的窗口:
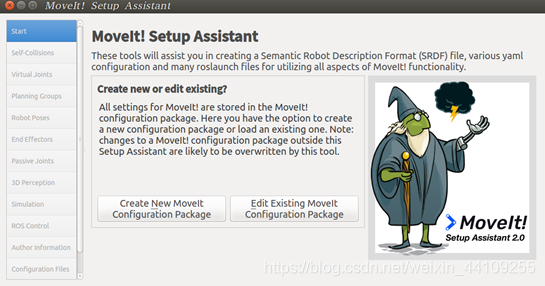
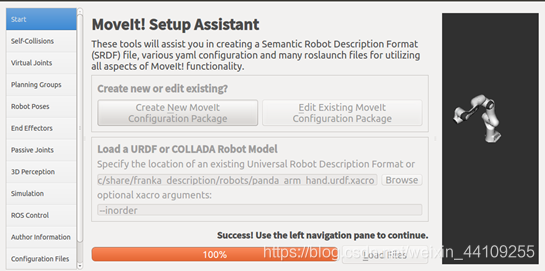
h) 我们选择Create New MoveIt! Configuration Package,在弹出的页面中点browse,选择路径/opt/ros/kinetic/share/franka_description/robots/panda_arm_hand.urdf.xacro ,确认后点load会出现下面这样的窗口:
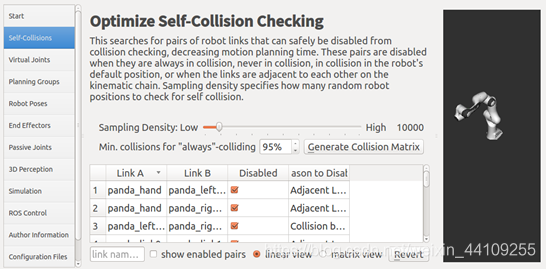
i) 下一步,配置self-collision,直接选择默认的95%,点击Generate Collision Matrix:
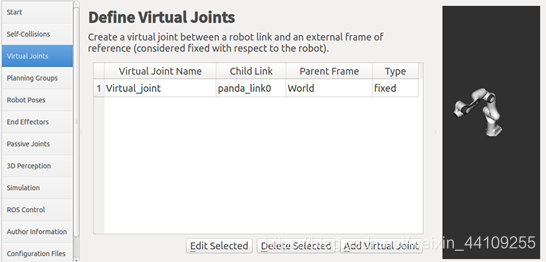
j) 下一步,定义Virtual Joints,像这样:
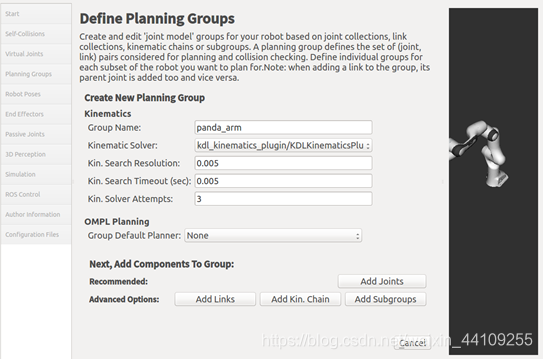
k) 接下来,定义Planning Groups,配置如图:
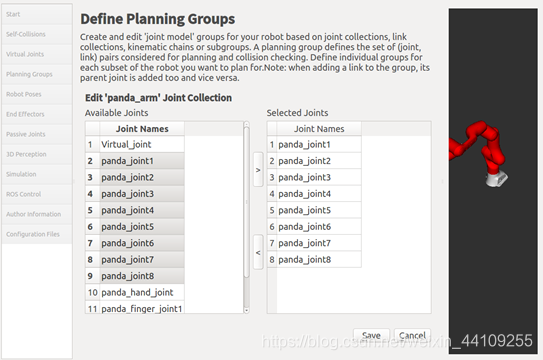
l) 点Add Joints,如下图选择这些joint:
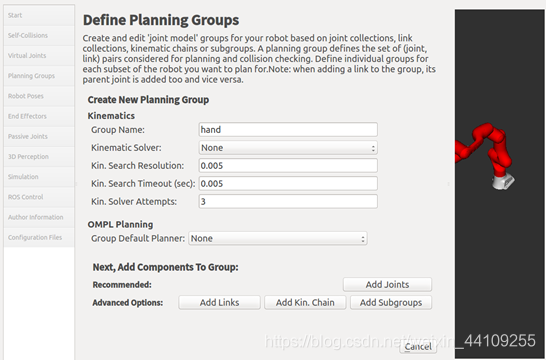
m) 点击save,再点击add group,然后如下配置:
n) 注意,接下来不用点add joints,我们点击Add Links,在弹出的窗口里选择如下links: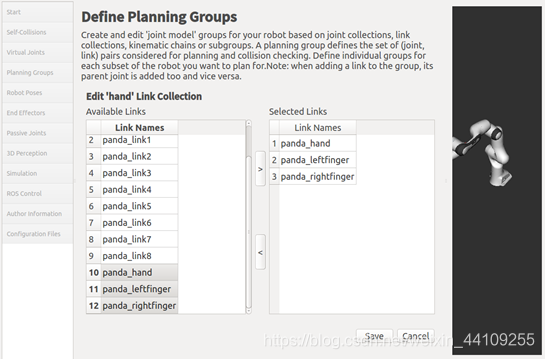
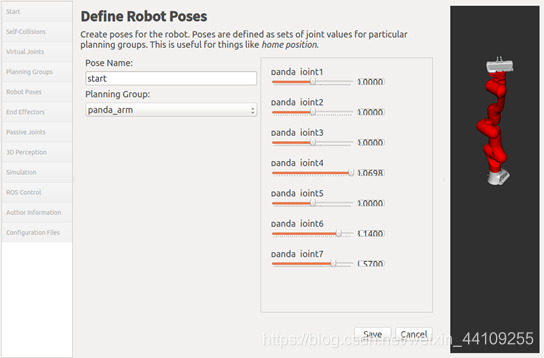
o) 接下来我们给机械臂设定几个特定的动作,选Robot poses, 点击add pose,调节8个joints,不用刻意调整数值,让姿态是直立就好,这一步主要是为了检查前几步是否正确:
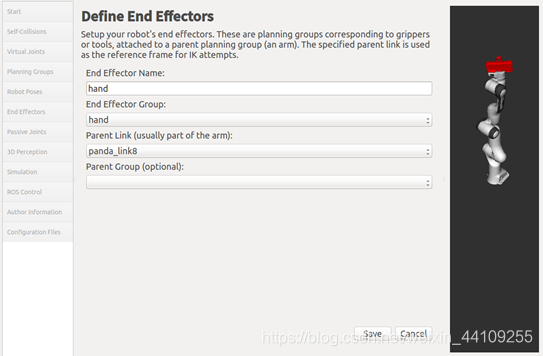
p) 接下来定义End Effectors,配置如下:
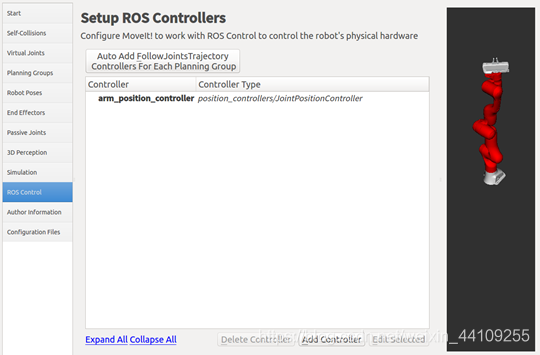
q) 鉴于我们没有加入深度相机,我们直接跳到ROS Control的部分,配置如下:
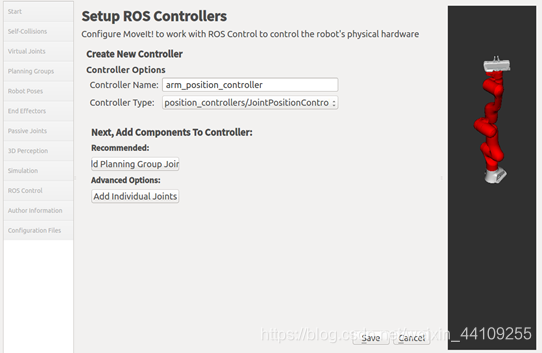
点击Add planning group joints,选择panda_arm:
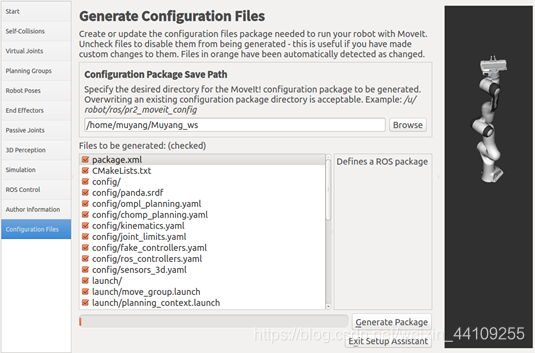
r) 在Author information里,填入作者姓名和邮箱,注意这里必须填写,否则无法生成仿真模型。最后在Configuration files里找到我们之前生成的工作区,点击Generate Package:
2. 配置实际机械臂:
a) 到目前为止,仿真模型已经配置好了,我们可以选择用运行demo.launch文件进行仿真,也可以选择自己配置一个新的文件来运行仿真,鉴于我们后面希望将仿真于真机连接起来,而demo.launch是做不到的,所以我们来自己配置一个运行环境。
b) 首先,在刚刚生成的panda_moveit_config下找到config文件夹,创建controllers.yaml文件,在文件内填写如下格式的命令行:
controller_list:
  - name: panda_arm_controller
    action_ns: execute_trajectory
    type: ExecuteTrajectory
    joints:
      - panda_joint1
      - panda_joint2
      - panda_joint3
      - panda_joint4
      - panda_joint5
      - panda_joint6
      - panda_joint7
      - panda_joint8
  - name: hand_controller
    action_ns: pickup
    type: Pickup
    joints:
      - panda_finger_joint1
      - panda_finger_joint2
      - panda_hand_joint
c) 然后再同样的config文件夹下,新建“joint_names.yaml”文件,将上一步中所有的joint都填写进去,格式是:
controller_joint_names: [panda_joint1, panda_joint2, panda_joint3, panda_joint4, panda_joint5, panda_joint6, panda_joint7, panda_joint8, panda_finger_joint1, panda_finger_joint2, panda_hand_joint]
d) 然后在launch文件夹下,修改panda_moveit_controller_manager.launch文件,注意:这里的panda根据不同的机械臂模型可能是不一样的,比如后面用到ur5机械臂时会修改为ur5。修改文件夹的内容为:
<launch>
<rosparam file="$(find panda_moveit_config)/config/controllers.yaml"/>
<param name="use_controller_manager" value="false"/>
<param name="trajectory_execution/execution_duration_monitoring" value="false"/>
<param name="moveit_controller_manager"
value="moveit_simple_controller_manager/MoveItSimpleControllerManager"/>
</launch>
e) 然后同样在launch文件夹下,新建panda_planning_execution.launch文件,文件内容格式为:
<launch>

 <arg name="sim" default="true"/>
  <rosparam command="load" file="$(find panda_moveit_config)/config/joint_names.yaml"/>

  <include file="$(find panda_moveit_config)/launch/planning_context.launch" >
    <arg name="load_robot_description" value="true" />
  </include>

  <group if="$(arg sim)">
  <node name="joint_state_publisher" pkg="joint_state_publisher" type="joint_state_publisher">
    <param name="/use_gui" value="false"/>
    <rosparam param="/source_list">[/joint_states]</rosparam>
  </node>
  </group>
<--!此处的group的部分是用来仿真时用的,连上真实机械臂的时候,需要删掉。-->

  <node name="robot_state_publisher" pkg="robot_state_publisher" type="robot_state_publisher" respawn="true" output="screen" />

  <include file="$(find panda_moveit_config)/launch/move_group.launch">
    <arg name="publish_monitored_planning_scene" value="true" />
    <arg name="allow_trajectory_execution" value="true"/>
    <!--arg name="fake_execution" value="true"/-->
    <arg name="info" value="true"/>
  </include>

  <include file="$(find panda_moveit_config)/launch/moveit_rviz.launch">
    <arg name="config" value="true"/>
  </include>

</launch>
6. 编写Python文件
- 在my_package下的src文件夹下新建file,取名为planning_script.py
#!/usr/bin/env python


# Author: Francis

import sys
import copy
import rospy
import moveit_commander
import moveit_msgs.msg
import geometry_msgs.msg
from math import pi
from std_msgs.msg import String
from moveit_commander.conversions import pose_to_list
from moveit_msgs.msg import RobotState, Constraints


moveit_commander.roscpp_initialize(sys.argv)
rospy.init_node('move_group_python_interface_tutorial',
                    anonymous=True)
robot = moveit_commander.RobotCommander()


scene = moveit_commander.PlanningSceneInterface()


group_name = "panda_arm"
group = moveit_commander.MoveGroupCommander(group_name)

display_trajectory_publisher = rospy.Publisher('/move_group/display_planned_path',
                                                   moveit_msgs.msg.DisplayTrajectory,
                                                   queue_size=1)

def wait_for_state_update(box_is_known=False, box_is_attached=False, timeout=4):

    box_name = "box"

    start = rospy.get_time()
    seconds = rospy.get_time()
    while (seconds - start < timeout) and not rospy.is_shutdown():

      attached_objects = scene.get_attached_objects([box_name])
      is_attached = len(attached_objects.keys()) > 0

      is_known = box_name in scene.get_known_object_names()

      if (box_is_attached == is_attached) and (box_is_known == is_known):
        return True

      rospy.sleep(0.1)
      seconds = rospy.get_time()

    return False

def creat_box(scene,group,pose=[]):

  rospy.sleep(2.0)

  box_pose = geometry_msgs.msg.PoseStamped()
  box_pose.header.frame_id = "panda_link0"
  box_pose.pose.orientation.w = pose[0]
  # box_pose.pose.orientation.x = 0.0
  # box_pose.pose.orientation.y = 0.0
  # box_pose.pose.orientation.z = 0.0
  box_pose.pose.position.x = pose[1]
  box_pose.pose.position.y = pose[2]
  box_pose.pose.position.z = pose[3]
  box_name = "box"
  scene.add_box(box_name, box_pose, size=(pose[4], pose[5], pose[6]))
  wait_for_state_update(box_is_known=True, timeout=5)

  print "============ Printing robot state"
  print robot.get_current_state()
  print ""


def go_to_pose(robot, group, pose=[]):
    pose_goal = geometry_msgs.msg.Pose()
    pose_goal.orientation.x = pose[3]
    pose_goal.orientation.y = pose[4]
    pose_goal.orientation.z = pose[5]
    pose_goal.orientation.w = pose[6]

    pose_goal.position.x = pose[0]
    pose_goal.position.y = pose[1]
    pose_goal.position.z = pose[2]
    group.set_pose_target(pose_goal)

    group.go(wait = True)
    print "============ Printing robot state"
    print robot.get_current_state()
    print ""

creat_box(scene,group,[1.0, 0.2, 0.2, 0.25, 0.1, 0.1, 0.5])

go_to_pose(robot, group, [0.30603, 0.017247, 0.64808, 0.59731, 0.52117, -0.4175, -0.44418])
# rospy.sleep(10.0)
go_to_pose(robot, group, [0.090837, 0.42689, 0.19629, 0.92343, 0.38265, -0.026938, -0.011112])


# result = group.go(wait=True)

group.stop()

group.clear_pose_targets()


rospy.sleep(10)

# moveit_commander.roscpp_shutdown()
- 创建launch文件,在my_package 文件夹下执行mkdir launch,再执行touch launch/my_package_launch_file.launch。在IDE中编写launch文件:
<launch>
    <!-- My Package launch file -->
	<node pkg="my_package" name="move_group_python_interface_tutorial"  type="planning_script.py" output="screen">
	</node>
</launch>
- 最后一步,为了能让刚刚新建的Python文件能执行,要修改它的执行权限,运行命令行
chmod u+x planning_script.py
7. 仿真与实验
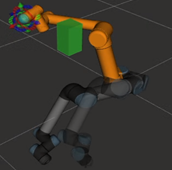
a) Panda机械臂的仿真:
- 打开终端,运行roscore
- 新建终端运行前面第5部分创建的panda_planning_execution.launch文件新建终端运行前面第5部分创建的panda_planning_execution.launch文件
- 再新建终端运行前面第6部分创建的my_package_launch_file.launch文件。
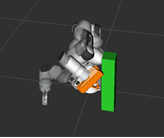
- 仿真效果如下:

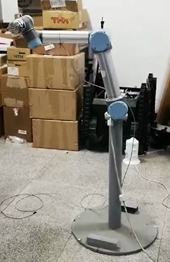
b) UR5机械臂的仿真与实验
(这部分是后加的,实习计划里本来没有这一项,但是因为提前完成了实习任务,所里又正好有空闲的机械臂,所以临时增加了实习内容,鉴于所里目前只有UR5机械臂可以供我使用,所以在真实机械臂上运行的轨迹规划是在UR5上实现的,3.8版本)
- 仿照前面在创建my package的ROS包之后,从github上下载ur_modern_driver, 网址是:https://github.com/ros-industrial/ur_modern_driver 和universal_robot,https://github.com/ros-industrial/universal_robot
- 跟随http://wiki.ros.org/rosdep的步骤,运行sudo apt-get install python-rosdep,用sudo rosdep init初始化rosdep
- 使用rosdep install --from-paths src --ignore-src -r -y 下载相关依赖包。完成时用catkin_make编译。注意:运行时需要将机器人通过网线与计算机连接到一起
- 因为所里的UR5是3.8版本的,所以需要修改之前下载的ur_modern_driver下的文件
- 修改ur_modern_driver下的src/robot_state_RT.cpp文件:在340行加上几行代码,修改对版本的支持。见第5条
- 修改ur_modern_driver下的include下的ur_modern_driver.h下的ur_hardware_interface.h文件,把canSwitch函数声明改成prepareSwitch, 把函数内的const尾缀删掉。
- 修改ur_modern_driver下的Cmakelist.txt,注释掉catkin_package的最后一项DEPENDS
- catkin_make刷新工作区
- 需要添加的程序行
else if (version_ >= 3.3 && version_ < 3.5) {
   	if (len != 1060)
   		len_good = false;
   } else if (version_ >= 3.5 && version_ <=3.8) {
   	if (len != 1108)
   	{
   		len_good = false;
   	}
}
- 仿照第六部分, 在Muyang_ws下的src文件夹下创建新的名为ur5_package的 ROS包。在此文件夹下创建新的Python文件:
#!/usr/bin/env python


import sys
import rospy
import moveit_commander
from moveit_commander import RobotCommander, roscpp_initialize, roscpp_shutdown
from moveit_msgs.msg import RobotState, Constraints
import geometry_msgs
from geometry_msgs.msg import Pose
from moveit_commander import MoveGroupCommander
import copy


if __name__=='__main__':

    roscpp_initialize(sys.argv)
    rospy.init_node('moveit_py_demo', anonymous=True)

    robot = RobotCommander()
    rospy.sleep(1)

    group = MoveGroupCommander("manipulator")
    # group.set_start_state(RobotState())

    scene = moveit_commander.PlanningSceneInterface()

    def wait_for_state_update(box_is_known=False, box_is_attached=False, timeout=4):
        # Copy class variables to local variables to make the web tutorials more clear.
        # In practice, you should use the class variables directly unless you have a good
        # reason not to.
        box_name = "box"

        ## BEGIN_SUB_TUTORIAL wait_for_scene_update
        ##
        ## Ensuring Collision Updates Are Receieved
        ## ^^^^^^^^^^^^^^^^^^^^^^^^^^^^^^^^^^^^^^^^
        ## If the Python node dies before publishing a collision object update message, the message
        ## could get lost and the box will not appear. To ensure that the updates are
        ## made, we wait until we see the changes reflected in the
        ## ``get_known_object_names()`` and ``get_known_object_names()`` lists.
        ## For the purpose of this tutorial, we call this function after adding,
        ## removing, attaching or detaching an object in the planning scene. We then wait
        ## until the updates have been made or ``timeout`` seconds have passed
        start = rospy.get_time()
        seconds = rospy.get_time()
        while (seconds - start < timeout) and not rospy.is_shutdown():
            # Test if the box is in attached objects
            attached_objects = scene.get_attached_objects([box_name])
            is_attached = len(attached_objects.keys()) > 0

            # Test if the box is in the scene.
            # Note that attaching the box will remove it from known_objects
            is_known = box_name in scene.get_known_object_names()

            # Test if we are in the expected state
            if (box_is_attached == is_attached) and (box_is_known == is_known):
                return True

            # Sleep so that we give other threads time on the processor
            rospy.sleep(0.1)
            seconds = rospy.get_time()

        # If we exited the while loop without returning then we timed out
        return False


    rospy.sleep(2.0)

    box_pose = geometry_msgs.msg.PoseStamped()
    box_pose.header.frame_id = "world"
    box_pose.pose.orientation.w = 1.0
    box_pose.pose.orientation.x = 0.0
    box_pose.pose.orientation.y = 0.0
    box_pose.pose.orientation.z = 0.0
    box_pose.pose.position.x = -0.04482
    box_pose.pose.position.y = -0.4
    box_pose.pose.position.z = 0.56438
    box_name = "box"
    scene.add_box(box_name, box_pose, size=(0.1, 0.1, 0.2))
    wait_for_state_update(box_is_known=True, timeout=5)

    # print("wait for state update")


    # start to move
    group.set_start_state_to_current_state()

    # print "current pose:"
    # print group.get_current_pose()
    c = Constraints()

    waypoints = []
    waypoints.append(group.get_current_pose().pose)

    # Move forward
    wpose = Pose()
    wpose.position.x = 0.25659
    wpose.position.y = -0.34674
    wpose.position.z = 0.62301
    wpose.orientation.x = 0.58494
    wpose.orientation.y = -0.41463
    wpose.orientation.z = -0.49934
    wpose.orientation.w = 0.48641

    waypoints.append(copy.deepcopy(wpose))


    # middle point
    wpose.position.x = -0.032889
    wpose.position.y = -0.21751
    wpose.position.z =  0.77293
    wpose.orientation.x = 0.58496
    wpose.orientation.y = -0.41468
    wpose.orientation.z = -0.4993
    wpose.orientation.w = 0.48637

    waypoints.append(copy.deepcopy(wpose))

# move up
    # wpose.position.x = -0.04482
    # wpose.position.y = 0.18196
    # wpose.position.z = 0.56438
    # wpose.orientation.x = -0.70709
    # wpose.orientation.y = 7.9492e-05
    # wpose.orientation.z = 4.5739e-06
    # wpose.orientation.w = 0.70713

    # waypoints.append(copy.deepcopy(wpose))

    # Move down
    # wpose.position.z -= 0.10
    # waypoints.append(wpose)
    wpose.position.x = -0.40715
    wpose.position.y = -0.44703
    wpose.position.z =  0.5731
    wpose.orientation.x = 0.58481
    wpose.orientation.y = -0.41475
    wpose.orientation.z = -0.49934
    wpose.orientation.w = 0.48645

    waypoints.append(copy.deepcopy(wpose))


    # Move to the side
    # wpose.position.y += 0.05
    # waypoints.append(wpose)

    # plan, fraction = group.compute_cartesian_path(waypoints, 0.01, 0.0, path_constraints=c)
    group.set_planning_time(20)


    # for i in range(10):
        # plan, fraction = group.compute_cartesian_path(waypoints, 0.01, 0.0, avoid_collisions=True)
        # print 'Plan success percent: ', fraction
        # if fraction >= 0.9:
        #     break
    group.set_pose_target(waypoints[0])
    plan1 = group.plan()
    group.go(wait=True)

    group.set_pose_target(waypoints[1])

    plan2 = group.plan()
    group.go(wait=True)


    group.set_pose_target(waypoints[2])

    plan3 = group.plan()
    group.go(wait=True)


    group.set_pose_target(waypoints[3])

    plan4 = group.plan()
    group.go(wait=True)

    group.stop()
# It is always good to clear your targets after planning with poses.
# Note: there is no equivalent function for clear_joint_value_targets()
    group.clear_pose_targets()
- 用网线连接真机之后,运行轨迹规划:
a. 运行roslaunch ur_modern_driver ur5_ros_control.launch limited:=true robot_ip:=“192.168.0.10”,这里的robot ip可以通过在终端内用ping的方式来获得
b. 新开一个终端,运行roslaunch panda_moveit_config mypanda_planning_execution.launch limited:=true
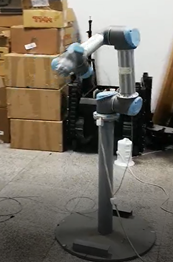
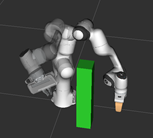
c. 再新开一个终端,运行刚刚新建的Python文件 - 运行结果:
完成以上步骤,UR5机械臂就会按照轨迹规划的多个点进行移动,但是要注意的是,虽然机械臂会按照规划好的空间点按照顺序移动,但是因为反运动学解析的算法原因,有些点可以对应多个姿态,这种情况会可能会导致机械臂大幅度的摆动,容易造成事故,所以在真机上运行时,一定要确保急停键待命。
仿真和真机运行结果: