JAVA操作RabbitMQ
RabbitMQ安装与JAVA使用
一、 linux环境安装
RabbitMQ介绍:使用Erlang语言开发的开源消息队列系统,基于AMQP协议来实现。AMQP的主要特征是面向消息、队列、路由(包括点对点和发布/订阅)、可靠性、安全。AMQP协议更多用在企业系统内对数据一致性、稳定性和可靠性要求很高的场景,对性能和吞吐量的要求还在其次。
rabbitMQ官网: https://www.rabbitmq.com/download.html
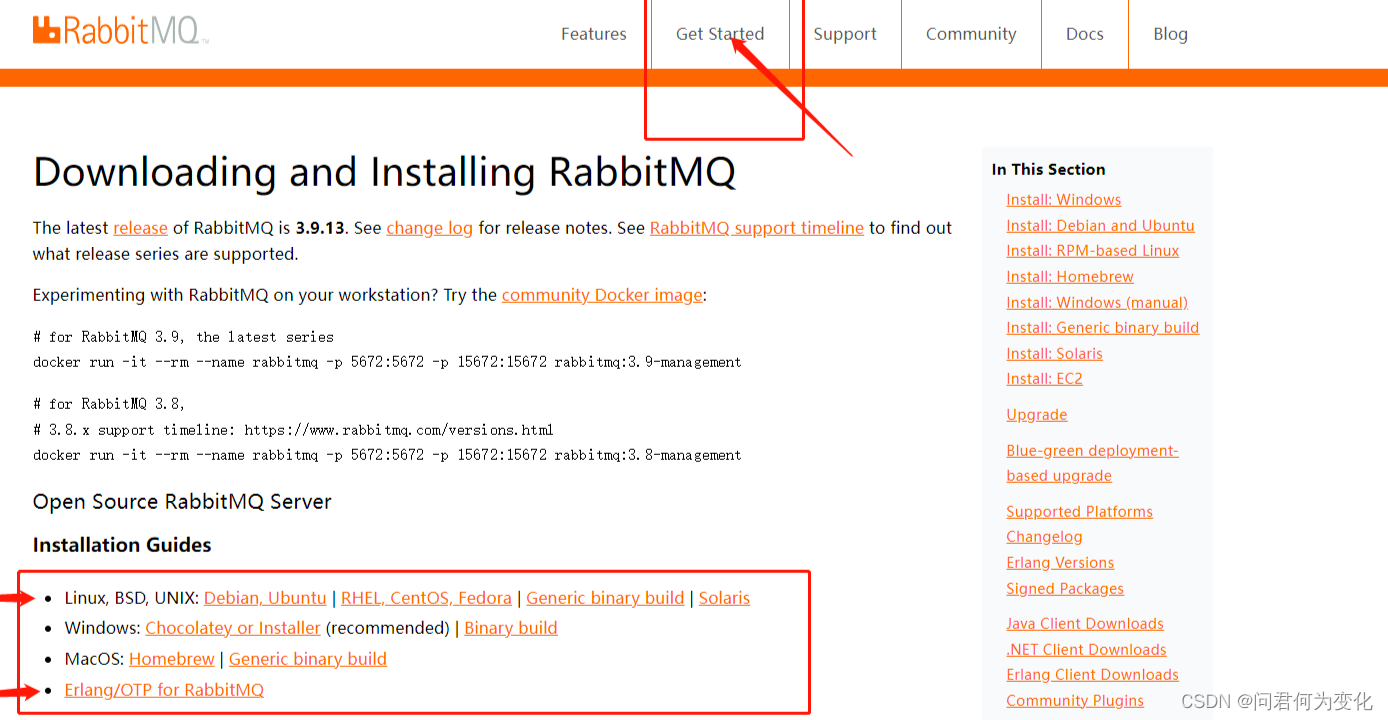
安装步骤如下:
1. 安装erlang环境, rpm -ivh erlang-22.3.4.12-1.el7.x86_64.rpm
2. 安装rabbitMQ(需要有外网),yum install -y rabbitmq-server-3.7.18-1.el7.noarch.rpm
3. 拷贝配置文件,cp /usr/share/doc/rabbitmq-server-3.7.18/rabbitmq.config.example /etc/rabbitmq/rabbitmq.config
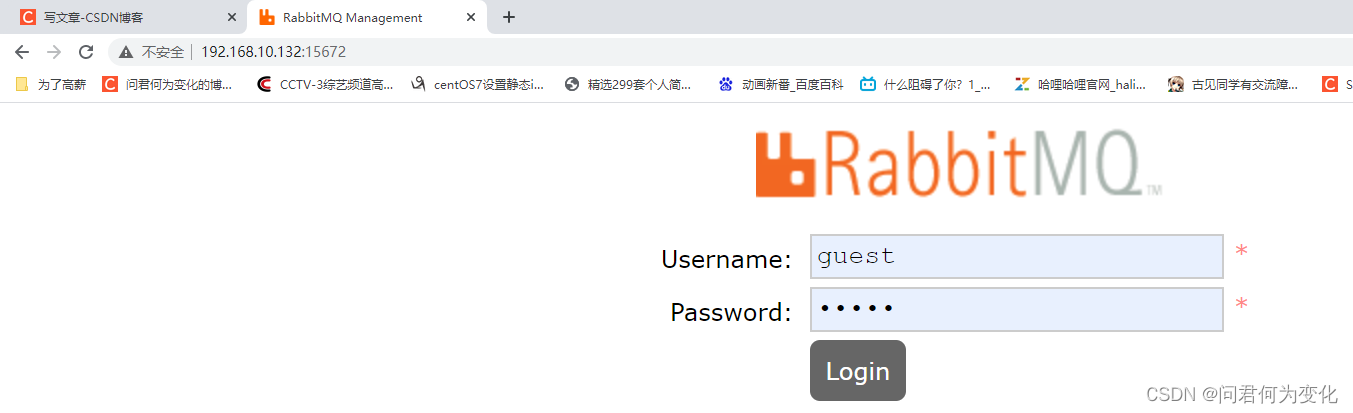
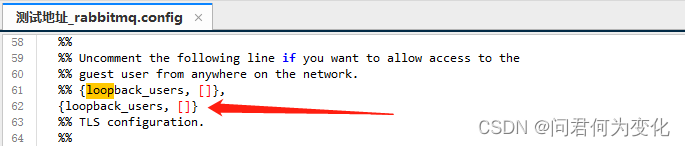
4.、修改rabbitmq.config文件,开启允许来宾用户登录访问页面(用户密码guest/guest)
5、启动rabbitMQ插件管理,rabbitmq-plugins enable rabbitmq_management
6、启动RabbitMQ服务(关闭、重启、查看状态命令)
systemctl start rabbitmq-server
systemctl stop rabbitmq-server
systemctl restart rabbitmq-server
systemctl status rabbitmq-server
7、关闭防火墙
[root@xupeng ~]# systemctl disable firewalld
[root@xupeng ~]# systemctl stop firewalld
8、访问页面,端口是15672
9、页面介绍

10、错误排查,因为我之前安装过一遍,所以没有问题,初次安装可能会出现如下两个错误
10.1. 提示socat依赖被需要,则执行yum -y install socat
10.2. rabbitMQ启动不起来,可以尝试再次调用重启命令,还是起不来 journalctl -xe 命令查看错误日志。我的日志里有这么一条错误ERROR: epmd error for host 192: badarg (unknown POSIX error) ,大概意思就是主机名称不能有数字,调整命令如下
# 查看下自己主机名称
[root@xupeng ~]# hostname
xupeng
# 修改下主机名称
[root@xupeng ~]# set-hostname xupeng
.
11、下面是实际操作,
[root@xupeng test]# ll
总用量 32200
drwxr-xr-x. 2 root root      222 9月   4 12:09 bin
-rw-r--r--. 1 root root 19991728 9月   8 09:39 erlang-22.3.4.12-1.el7.x86_64.rpm
-rw-r--r--. 1 root root 10494431 9月   8 09:39 rabbitmq-server-3.7.18-1.el7.noarch.rpm
drwxrwxr-x. 7 root root     4096 10月  4 2021 redis-6.2.6
-rw-r--r--. 1 root root  2476542 4月  12 22:58 redis-6.2.6.tar.gz

[root@xupeng test]# rpm -ivh erlang-22.3.4.12-1.el7.x86_64.rpm
警告:erlang-22.3.4.12-1.el7.x86_64.rpm: 头V4 RSA/SHA1 Signature, 密钥 ID 6026dfca: NOKEY
准备中...                          ################################# [100%]
正在升级/安装...
   1:erlang-22.3.4.12-1.el7           ################################# [100%]
[root@xupeng test]# yum list | grep erlang
erlang.x86_64                             22.3.4.12-1.el7              installed
[root@xupeng test]# yum -y remove erlang-*
已加载插件:fastestmirror, langpacks
参数 erlang-22.3.4.12-1.el7.x86_64.rpm 没有匹配
不删除任何软件包

[root@xupeng test]# yum install -y rabbitmq-server-3.7.18-1.el7.noarch.rpm
已加载插件:fastestmirror, langpacks
正在检查 rabbitmq-server-3.7.18-1.el7.noarch.rpm: rabbitmq-server-3.7.18-1.el7.noarch
rabbitmq-server-3.7.18-1.el7.noarch.rpm 将被安装
正在解决依赖关系
There are unfinished transactions remaining. You might consider running yum-complete-transaction, or "yum-complete-transaction --cleanup-only" and "yum history redo last", first to finish them. If those don't work you'll have to try removing/installing packages by hand (maybe package-cleanup can help).
--> 正在检查事务
---> 软件包 rabbitmq-server.noarch.0.3.7.18-1.el7 将被 安装
--> 解决依赖关系完成

依赖关系解决

===============================================================================================================================================================================================================================
 Package                                            架构                                      版本                                               源                                                                       大小
===============================================================================================================================================================================================================================
正在安装:
 rabbitmq-server                                    noarch                                    3.7.18-1.el7                                       /rabbitmq-server-3.7.18-1.el7.noarch                                     11 M

事务概要
===============================================================================================================================================================================================================================
安装  1 软件包

总计:11 M
安装大小:11 M
Downloading packages:
Running transaction check
Running transaction test
Transaction test succeeded
Running transaction
警告:RPM 数据库已被非 yum 程序修改。
  正在安装    : rabbitmq-server-3.7.18-1.el7.noarch                                                                                                                                                                        1/1
  验证中      : rabbitmq-server-3.7.18-1.el7.noarch                                                                                                                                                                        1/1

已安装:
  rabbitmq-server.noarch 0:3.7.18-1.el7
完毕!


[root@xupeng test]# ll /usr/share/doc/rabbitmq-server-3.7.18/rabbitmq*
-rw-r--r--. 1 root root 33235 9月  16 2019 /usr/share/doc/rabbitmq-server-3.7.18/rabbitmq.config.example
[root@xupeng test]# cp /usr/share/doc/rabbitmq-server-3.7.18/rabbitmq.config.example /etc/rabbitmq/rabbitmq.config
修改配置文件
继续回到linux
[root@xupeng rabbitmq]# rabbitmq-plugins enable rabbitmq_management
Enabling plugins on node rabbit@xupeng:
rabbitmq_management
The following plugins have been configured:
  rabbitmq_management
  rabbitmq_management_agent
  rabbitmq_web_dispatch
Applying plugin configuration to rabbit@xupeng...
The following plugins have been enabled:
  rabbitmq_management
  rabbitmq_management_agent
  rabbitmq_web_dispatch
set 3 plugins.
Offline change; changes will take effect at broker restart.

[root@xupeng ~]# systemctl disable firewalld
[root@xupeng ~]# systemctl stop firewalld
[root@xupeng ~]# systemctl start rabbitmq-server
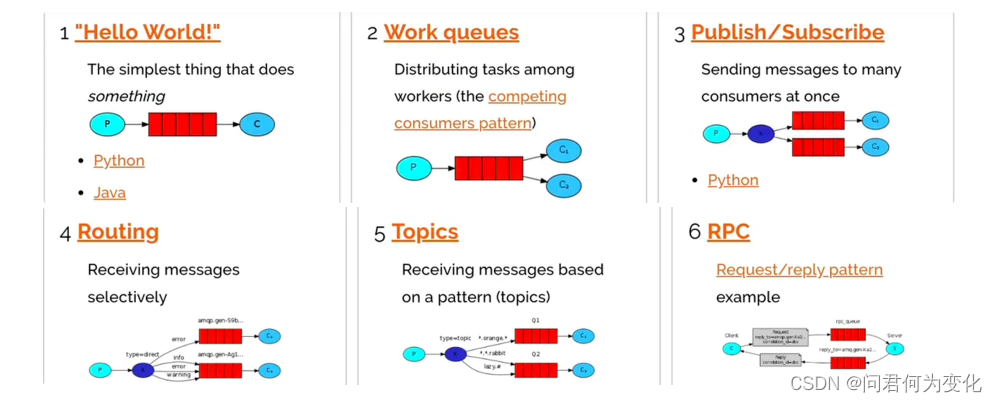
二、模型演示
最左侧圆点是生产者,最右侧圆点是消费者,红色的是队列,深蓝的圆点是路由
大致使用就是生产者的消息可以通过路由或直接向队列里添加,消费者从队列里获取
<dependencies>
    <dependency>
        <groupId>com.rabbitmq</groupId>
        <artifactId>amqp-client</artifactId>
        <version>5.7.2</version>
    </dependency>
    <dependency>
        <groupId>junit</groupId>
        <artifactId>junit</artifactId>
        <version>4.11</version>
    </dependency>
    <dependency>
        <groupId>com.rabbitmq</groupId>
        <artifactId>amqp-client</artifactId>
        <version>5.7.2</version>
    </dependency>
</dependencies>
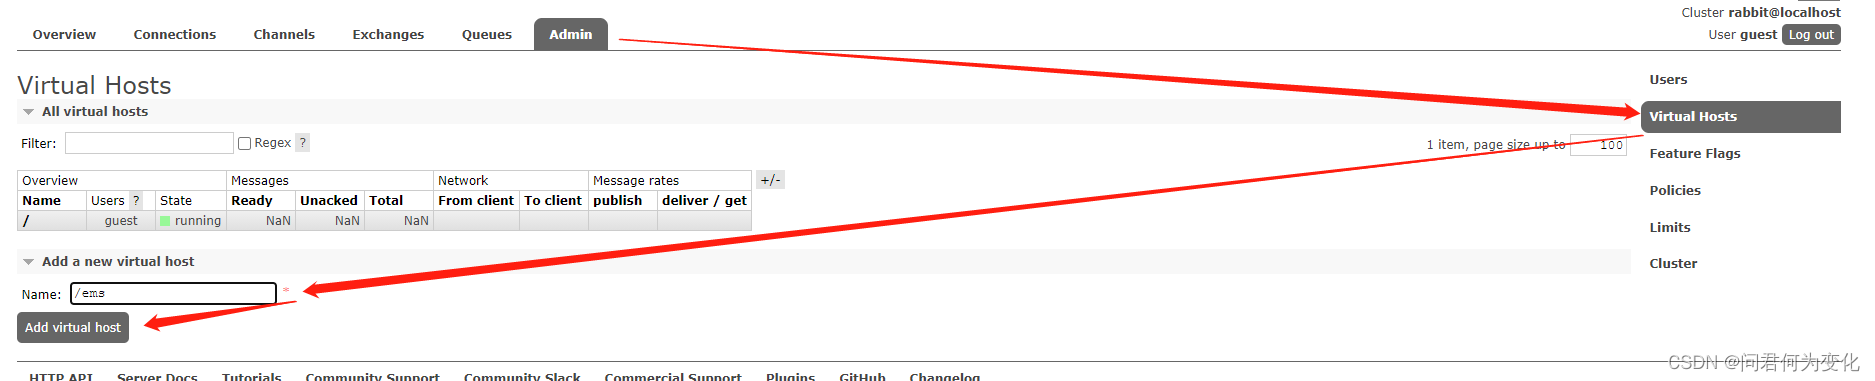
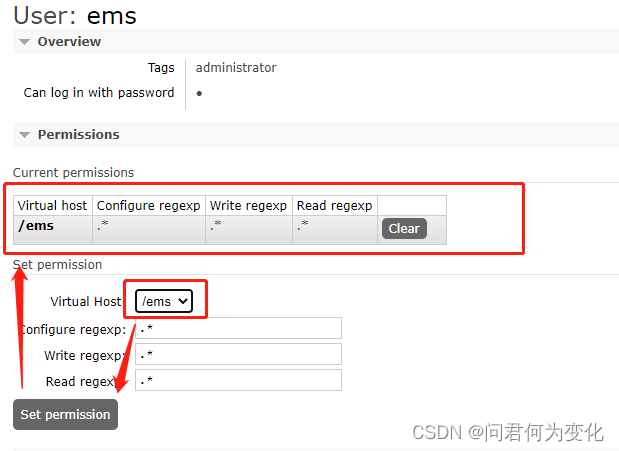
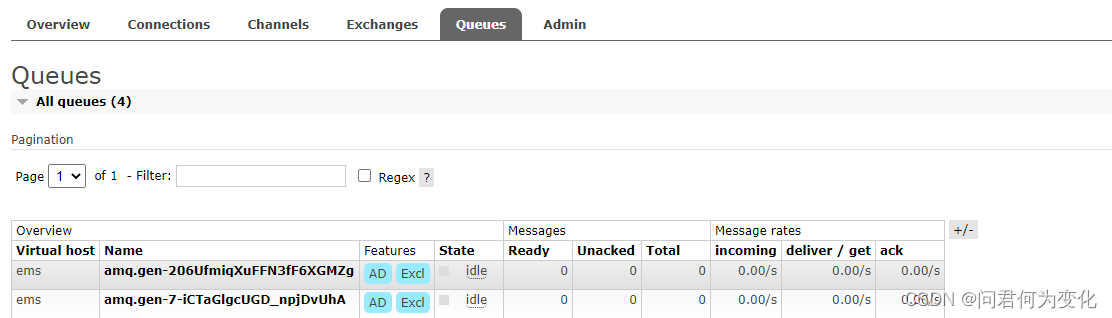
2.1.HelloWord模型(直连)
消费者直接放消息到队列,生产者取走。只允许一个消费者对一生产者。
首先在管理页面创建虚拟主机,配置一个用户访问虚拟主机
图一↓
图二↓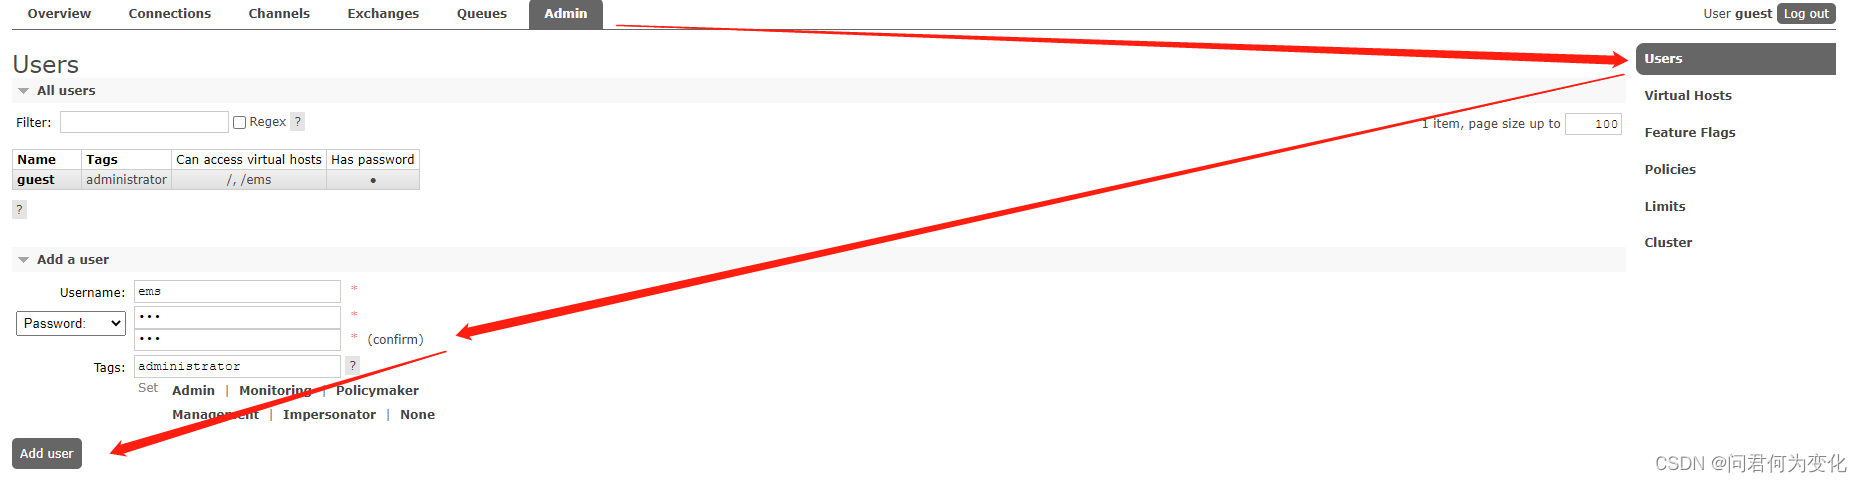
图三↓
代码测试↓
1.启动Customer类main方法
2.启动Provider类main方法
3.管理页面可以看到当前队列信息

import com.rabbitmq.client.Channel;
import com.rabbitmq.client.Connection;
import java.io.IOException;
public class Provider {
    public static void main(String[] args) throws IOException {
        Connection connection = RabbitMQUtils.getConnection();
        // 从连接中获取通道
        Channel channel = connection.createChannel();
        // 参数一:让通道与消息队列绑定,这样才知道发送给哪个消息队列,队列名称(没有自己创建)
        // 参数二:队列是否要持久化,true开启。
        // 参数三:是否独占队列,true独占
        // 参数四:是否消费完成后自动删除队列,true自动删除,
        // 参数五:额外参数
        channel.queueDeclare("hello", false, false, false, null);
        // 发布消息
        // 参数1:交换机名称  参数2:队列名称  参数3:额外参数  参数4:消息
        channel.basicPublish("","hello",null,"我要向队列中传递消息了".getBytes());
        RabbitMQUtils.closeChannlAndConnection(channel, connection);
    }
}

import com.rabbitmq.client.*;
import java.io.IOException;
public class Customer {
    public static void main(String[] args) throws Exception {
        Connection connection = RabbitMQUtils.getConnection();
        Channel channel = connection.createChannel();
        channel.queueDeclare("hello", false, false, false, null);
        // 消费消息
        // 参数1:消费的消息队列名称  参数2:开启消息的自动确认机制 参数3:回调函数
        channel.basicConsume("hello",true, new DefaultConsumer(channel){
            @Override
            public void handleDelivery(String consumerTag, Envelope envelope, AMQP.BasicProperties properties, byte[] body) throws IOException {
                System.out.println("body是:" + new String(body));
            }
        });
        // 因为basicConsume函数属于异步消费,正常需要开启线程去监听消息队列,如果关闭会导致主线程退出
        // 消费者就因该一直阻塞,等待消费
        // channel.close();
        // connection.close();
    }
}


/**
* 获取连接工具类,防止导错类,类路径也给出来了
*/
import com.rabbitmq.client.Channel;
import com.rabbitmq.client.Connection;
import com.rabbitmq.client.ConnectionFactory;
public class RabbitMQUtils {
    // 创建链接MQ的工厂
    private static ConnectionFactory connectionFactory;
    static {
        connectionFactory = new ConnectionFactory();
        // 设置地址
        connectionFactory.setHost("192.168.10.132");
        // 端口不是web控制页面的那个端口
        connectionFactory.setPort(5672);
        // 虚拟主机
        connectionFactory.setVirtualHost("ems");
        // 用户和密码
        connectionFactory.setUsername("ems");
        connectionFactory.setPassword("ems");
    }
    public static Connection getConnection(){
        try {
            // 获取链接对象
            Connection connection = connectionFactory.newConnection();
            return connection;
        } catch (Exception e) {
            e.printStackTrace();
        }
        return null;
    }
    public static void closeChannlAndConnection(Channel channel, Connection connection){
        try {
            channel.close();
        } catch (Exception e) {
            e.printStackTrace();
        }
        try {
            connection.close();
        } catch (Exception e) {
            e.printStackTrace();
        }
    }
}
细节补充
queueDeclare方法的第二个参数是否持久化队列,设置为true的话,在重启MQ时会保存在磁盘,下次启动时恢复队列。开启持久化的话,标志是个D,但是消息队列里的消息不会持久化,依然丢失。
持久化消息通过channel.basicPublish方法配置MessageProperties.PERSISTENT_TEXT_PLAIN
//channel.basicPublish(“”,“hello”, MessageProperties.PERSISTENT_TEXT_PLAIN,“你好呀11”.getBytes());

2.2.WorkQueue(任务模型)
直连模型如果消费速度比生产速度慢,可能会导致任务队列的任务越来越多,并且得不到消费。任务模型可以让多个消费者绑定到一个队列。共同消费队列中的消息。队列中的消息一旦消费,就会消失,因此任务是不会被重复执行的。
2.2.1 平均分配 - 假设有两个消费者,十个任务,每个线程会各分配5个,并不会因为某一线程处理速度快而多消费
启动下图的Customer1、Customer2,然后启动Provider向队列中添加消息查看效果。
因为开启了自动确认机制,如果消息消费过程中出现异常,该消息并不会放回至队列中,导致消息消失。自动确认机制是预先从队列获取好任务并删除队列中的任务,实际上此时还并为消费。
public class Provider {
    public static void main(String[] args) throws IOException {
        Connection connection = RabbitMQUtils.getConnection();
        Channel channel = connection.createChannel();
        channel.queueDeclare("work", true, false, false, null);
        for (int i = 0; i < 10; i++) {
            channel.basicPublish("","work", null,("你好呀" + i).getBytes());
        }
        RabbitMQUtils.closeChannlAndConnection(channel, connection);
    }
}
public class Customer1 {
    public static void main(String[] args) throws IOException, TimeoutException {
        Connection connection = RabbitMQUtils.getConnection();
        Channel channel = connection.createChannel();
        channel.queueDeclare("work", true, false, false, null);
        channel.basicConsume("work",true, new DefaultConsumer(channel){
            @Override
            public void handleDelivery(String consumerTag, Envelope envelope, AMQP.BasicProperties properties, byte[] body) throws IOException {
                System.out.println("消费者1:" + new String(body));
            }
        });
    }
}
public class Customer2 {// 与消费者1代码一至}
2.2.2 能者多劳 - 处理速度快的线程会多消费任务
修改消费者代码,关闭消息自动确认机制,由于消费者2方法必然会报错导致消息消费失败,会将消息重新放回队列。如果不调用channel.basicAck或channel.basicNack,方法线程无法判断消息是否处理完成导致线程一直阻塞。从而无法重新去消息队列获取数据。
public class Customer1 {
    public static void main(String[] args) throws IOException, TimeoutException {
        Connection connection = RabbitMQUtils.getConnection();
        Channel channel = connection.createChannel();
        channel.queueDeclare("work", true, false, false, null);
        // 表示一次只消费一个消息
        channel.basicQos(1);
        // 关闭任务自动确认机制
        channel.basicConsume("work",false, new DefaultConsumer(channel){
            @Override
            public void handleDelivery(String consumerTag, Envelope envelope, AMQP.BasicProperties properties, byte[] body) throws IOException {
                System.out.println("消费者1:" + new String(body));
                try {
                    Thread.sleep(10);
                    // 此处需要手动确认任务完成,否则不会接取下一个任务,队列任务中会出现未确认的数量
                    channel.basicAck(envelope.getDeliveryTag(), false);
                } catch (InterruptedException e) {
                    e.printStackTrace();
                }
            }
        });
    }
}

public class Customer2 {
    public static void main(String[] args) throws IOException, TimeoutException {
        Connection connection = RabbitMQUtils.getConnection();
        Channel channel = connection.createChannel();
        channel.queueDeclare("work", true, false, false, null);
        // 表示一次只消费一个消息
        channel.basicQos(1);
        // 关闭自动确认机制
        channel.basicConsume("work",false, new DefaultConsumer(channel){
            @Override
            public void handleDelivery(String consumerTag, Envelope envelope, AMQP.BasicProperties properties, byte[] body) throws IOException {
                try {
                    System.out.println("消费者2:" + new String(body));
                    Thread.sleep(40);
                    int x = 10 / 0;
                    // 此处需要手动确认任务完成,否则不会接取下一个任务,队列任务中会出现未确认的数量
                    channel.basicAck(envelope.getDeliveryTag(), false);
                } catch (Exception e) {
                    e.printStackTrace();
                    channel.basicNack(envelope.getDeliveryTag(), false, true);
                }
            }
        });
    }
}
2.3.fanout模型(广播)
Publish/Subscribe:广播模型,可以有多个消费者,并且每个消费者有自己的队列,生产者将消息发送给交换机,交换机来决定放入哪个队列当中
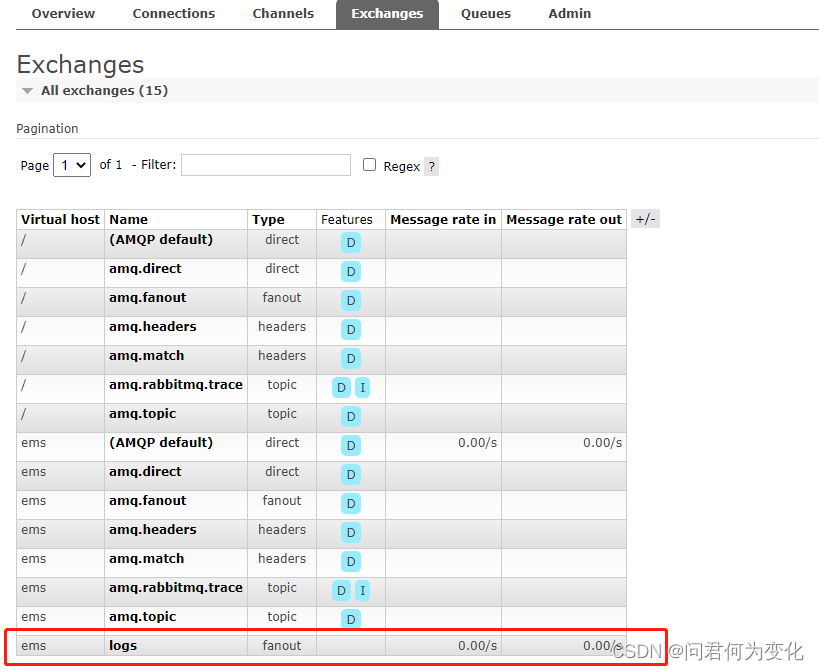
下图代码:消费者启动时创建了两个临时队列,生产者将信息传入到logs交换机中,交换机将消息放入到了两个队列中,所以消费者1与消费者2均能消费同样的信息
public class Provider {
    public static void main(String[] args) throws IOException {
        Connection connection = RabbitMQUtils.getConnection();
        Channel channel = connection.createChannel();
        // 指定交换机,交换机名称,交换机类型, fanout = 广播类型
        channel.exchangeDeclare("logs","fanout");
        // 交换机指向logs,第二个参数是路由key参数,此时还没有意义,可以为空
        channel.basicPublish("logs","work", null,"你好呀".getBytes());
        RabbitMQUtils.closeChannlAndConnection(channel, connection);
    }
}
public class Customer1 {
    public static void main(String[] args) throws Exception {
        Connection connection = RabbitMQUtils.getConnection();
        Channel channel = connection.createChannel();
        // 绑定交换机
        channel.exchangeDeclare("logs","fanout");
        // 获取临时队列,并绑定临时队列
        String queueName = channel.queueDeclare().getQueue();
        channel.queueBind(queueName, "logs", "");
        // 消费消息
        channel.basicConsume(queueName,true, new DefaultConsumer(channel){
            @Override
            public void handleDelivery(String consumerTag, Envelope envelope, AMQP.BasicProperties properties, byte[] body) throws IOException {
                System.out.println("消费者1:" + new String(body));
            }
        });
    }
}
public class Customer2 {
  //....一样的代码....
}
2.4.Direct模型(路由直连)
广播模式增强版,队列与交换机的绑定时,要指定一个RoutingKey (路由key),Exchange不再把消息交给每一个绑定的队列,而是根据消息的Routing Key进行判断,只有队列的Routingkey与队列的Routing key完全一致,才会接收到消息。
public class Provider {
    public static void main(String[] args) throws IOException {
        Connection connection = RabbitMQUtils.getConnection();
        Channel channel = connection.createChannel();
        // 指定交换机,交换机类型
        channel.exchangeDeclare("logs2","direct");
        // 交换机指向logs,指定路由参数
        channel.basicPublish("logs2","info", null,"我是info信息".getBytes());
        channel.basicPublish("logs2","error", null,"我是error信息".getBytes());
        RabbitMQUtils.closeChannlAndConnection(channel, connection);
    }
}
public class Customer1 {
    public static void main(String[] args) throws Exception {
        Connection connection = RabbitMQUtils.getConnection();
        Channel channel = connection.createChannel();
        // 绑定交换机,指定模式为路由直连
        channel.exchangeDeclare("logs2","direct");
        // 获取临时队列,并绑定临时队列, routingKey
        String queueName = channel.queueDeclare().getQueue();
        channel.queueBind(queueName, "logs2", "error");
        // 消费消息
        channel.basicConsume(queueName,true, new DefaultConsumer(channel){
            @Override
            public void handleDelivery(String consumerTag, Envelope envelope, AMQP.BasicProperties properties, byte[] body) throws IOException {
                System.out.println("消费者1:" + new String(body));
            }
        });
    }
}
public class Customer2 {
    public static void main(String[] args) throws Exception {
        Connection connection = RabbitMQUtils.getConnection();
        Channel channel = connection.createChannel();
        // 绑定交换机,指定模式为路由直连
        channel.exchangeDeclare("logs2","direct");
        // 获取临时队列,并绑定临时队列, routingKey
        String queueName = channel.queueDeclare().getQueue();
        channel.queueBind(queueName, "logs2", "info");
        // 消费消息
        channel.basicConsume(queueName,true, new DefaultConsumer(channel){
            @Override
            public void handleDelivery(String consumerTag, Envelope envelope, AMQP.BasicProperties properties, byte[] body) throws IOException {
                System.out.println("消费者1:" + new String(body));
            }
        });
    }
}
2.5.Topic模型(订阅/动态路由模型)
路由模式的路由key是一个固定值,而Topic模型的路由值可以用通配符
通配符*:一个或多个词语,比如log.*,可以匹配log.a.b,log.aaaa.bbb
通配符#:只能匹配一个词,比如log.#能陪陪log.a,log.b
PS: 也可以俩通配符一起用,比如: *.log.#
public class Provider {
    public static void main(String[] args) throws IOException {
        Connection connection = RabbitMQUtils.getConnection();
        Channel channel = connection.createChannel();
        // 指定交换机,交换机名称,交换机类型, topic= 动态路由模式
        channel.exchangeDeclare("topics","topic");
        // 发送消息
        channel.basicPublish("topics","user.save", null,("我是AAAAA").getBytes());
        RabbitMQUtils.closeChannlAndConnection(channel, connection);
    }
}

public class Customer1 {
    public static void main(String[] args) throws Exception {
        Connection connection = RabbitMQUtils.getConnection();
        Channel channel = connection.createChannel();
        // 绑定交换机
        channel.exchangeDeclare("topics","topic");
        // 获取临时队列,并绑定临时队列, routingKey
        String queueName = channel.queueDeclare().getQueue();
        channel.queueBind(queueName, "topics", "user.#");
        channel.queueBind(queueName, "topics", "*.user.#");
        // 消费消息
        channel.basicConsume(queueName,true, new DefaultConsumer(channel){
            @Override
            public void handleDelivery(String consumerTag, Envelope envelope, AMQP.BasicProperties properties, byte[] body) throws IOException {
                System.out.println("消费者1:" + new String(body));
            }
        });
    }
}
三、springboot整合
依赖与配置文件
<dependency>
    <groupId>org.springframework.boot</groupId>
    <artifactId>spring-boot-starter-web</artifactId>
</dependency>
<dependency>
    <groupId>org.springframework.boot</groupId>
    <artifactId>spring-boot-starter-amqp</artifactId>
</dependency>
server.port=80
spring.application.name=rabbitMQboot
spring.rabbitmq.host=192.168.14.130
spring.rabbitmq.port=5672
spring.rabbitmq.username=ems
spring.rabbitmq.password=123456
spring.rabbitmq.virtual-host=/ems
3.1 直连模型
/**
*	用于向消息队列添加数据
*/
@Controller
@RequestMapping("/test")
public class TestController {
    // 注入RabbitTemplate
    @Autowired
    RabbitTemplate rabbitTemplate;
    @RequestMapping("/hello")
    public void helloWord(){
        rabbitTemplate.convertAndSend("hello","我是消息");
    }
}
// 表示监听的队列,declare 表示是否持久化队列,是否自动删除
// 默认持久化 非独占 自动删除
@Component
@RabbitListener(queuesToDeclare = @Queue(name = "hello",declare = "false",autoDelete = "true"))
public class CustomerController {
    // 表示这个是处理消息的回调函数
    @RabbitHandler
    public void receivel(String msg){
        System.out.println("收到消息:" + msg);
    }
}
3.2 任务模型
@Controller
@RequestMapping("/test")
public class TestController {
    // 注入RabbitTemplate
    @Autowired
    RabbitTemplate rabbitTemplate;
    @RequestMapping("/work")
    public void work(){
        for (int i = 0; i < 10; i++) {
            rabbitTemplate.convertAndSend("work","work模型" + i);
        }
    }
}
@Component
public class WorkController {
    @RabbitListener(queuesToDeclare = @Queue("work"))
    public void receivel1(String msg){
        System.out.println("消费者1" + msg);
    }
    @RabbitListener(queuesToDeclare = @Queue("work"))
    public void receivel2(String msg){
        System.out.println("消费者2" + msg);
    }
}
3.3 广播模型
@Controller
@RequestMapping("/test")
public class TestController {
    @Autowired
    RabbitTemplate rabbitTemplate;
    @RequestMapping("/fanout")
    public void fanout(){
        // 路由key不写
        rabbitTemplate.convertAndSend("logs","","广播数据");
    }
}

@Component
public class FanoutController {
    @RabbitListener(bindings =@QueueBinding(
            // 绑定一个临时队列,绑定交换机
            value = @Queue,exchange = @Exchange(value = "logs",type = "fanout")
        ))
    public void receivel1(String msg){
        System.out.println("消费者1" + msg);
    }
    @RabbitListener(bindings =@QueueBinding(
            // 绑定一个临时队列,绑定交换机
            value = @Queue,exchange = @Exchange(value = "logs",type = "fanout")
    ))
    public void receivel2(String msg){
        System.out.println("消费者2" + msg);
    }
}
3.4 路由模型
@Controller
@RequestMapping("/test")
public class TestController {
    // 注入RabbitTemplate
    @Autowired
    RabbitTemplate rabbitTemplate;
    @RequestMapping("/route")
    public void route(){
        rabbitTemplate.convertAndSend("directs","info","发送info级别的路由信息");
    }
}

@Component
public class RouteController {
    @RabbitListener(bindings = @QueueBinding(
            value = @Queue,//临时队列
            exchange = @Exchange(value = "directs",type = "direct"),
            key = {"info","error"} //路由key
    ))
    public void receivel1(String msg){
        System.out.println("消费者1" + msg);
    }

    @RabbitListener(bindings = @QueueBinding(
            value = @Queue,//临时队列
            exchange = @Exchange(value = "directs",type = "direct"),
            key = {"info"} //路由key
    ))
    public void receive2(String msg){
        System.out.println("消费者2" + msg);
    }
}
3.4 、订阅(动态路由)
@Controller
@RequestMapping("/test")
public class TestController {
    // 注入RabbitTemplate
    @Autowired
    RabbitTemplate rabbitTemplate;
    @RequestMapping("/topic")
    public void topic(){
        rabbitTemplate.convertAndSend("topics","rizhi.info","动态路由");
    }
}
@Component
public class TopicController {
    @RabbitListener(bindings = @QueueBinding(
            value = @Queue,
            exchange = @Exchange(type = "topic",name = "topics"),
            key = {"user.#","rizhi.info"}
    ))
    public void recevicel(String msg){
        System.out.println("消费者1" + msg);
    }
}